12 July, 2022

This REALLY sucks. My dust collection system is finally done. For now.

If you have been through the shop tour page, you know that our dust collection system consists of a modified old model green Harbor Freight "Central Machinery" 2 HP dust collector. It has been modified by swapping out the pitifully undersized 9" impeller, with a proper sized 12" impeller sourced from Wen tools, the part is the 3403-22 Turbofan. The dust spewing original so called filter bag was never installed, but instead the filter was replaced with a Wynn 35A MERV15 pleated filter, and to keep the filter as clean as possible while keeping air flow at a maximum I fabricated and installed a neutral vane. I am now pulling fast enough my anemometer can not read the air speed. That's not all that impressive as with the 5" inlet that means I am pulling over 1K CFM at the impeller inlet. 

An old photo of the HF DC


I know I am a wierd one. MOST people run even sized dust collection ducting. 4 or 6 inch with the Harbor Freight 2HP dust collector. But even with the upgraded filter and impeller all of the experts I read tell me 6" is just too big, and 4" is too small. And, well 5.5" doesn't exist... 

Cross section of a circle as you may recall is A  = π * r2

Thus.

4" Duct        5" Duct       6" Duct
12.566"        19.634"       28.27"

A visual comparison between 4" and 5" ABS fittings.

So... long story short, due to limitations inherent to 2HP dust collection blowers, and contrary to very popular opinion including several dust collector manufacturers, which are notorious for overstating the capability of their equipment, I opted to play it "safe" and went with 5".

Now 5" plastic hose is plentiful, with all those ribs and ridges, which would be coutner productive and I would have been better off with 4" performance wise. 

Long story short, which is a rarity for me, but I removed the floor level 4" run, and replaced it with 5" runs about 3' off the floor, and a run up the wall and accross the ceiling, where I have to pull dust up I reduce to 4" sacrificing volume hopefully for velocity.

Components used in the system were bought over a long time of collecting when sales came up on the cheap, or literally castoff material from close by construction projects. But the pieces used at best prices I can find them now. Mind you, I AM going to post affiliate links where I have them, and would GREATLY appreciate you supporting my work by using them if you are doing this project, but with that in mind, I will make every effort to give you the best prices I know of available online. Very often this is NOT with anyone I have affiliates with.  I appreciate your support, but I do what I do to share a budget approach to what can be a very expensive pursuit. I would rather save you a nickel than make $5.00 for myself. That might make me an idiot, but I am a firm believer into the if you bless someone, blessings will come back around to you one way or another.

Harbor Freight 2HP dust collector. Current model is going for $249.00, I bought mine well over a decade ago for a lot less. https://www.harborfreight.com/2-hp-industrial-5-micron-dust-collector-97869.html If I were to do it again today, I would buy the Wen 3403 and call it good.

Turbo Fan for Wen 3403 currently shows for $49.00 which is higher than the $35.00 I paid but still MUCH better than the $150.00+ for the Rikon impeller. https://wenproducts.com/products/3403-022-turbo-fan-for-wen-3403?_pos=1&_sid=f530916dc&_ss=r The web site shows out of stock, which is no surprise as supply chain blah blah. Just keep looking. Again I would have just bought the 3403 if I were starting new.


Wen or Harbor Freight, or any other dust collector with bag filters, you REALLY need to upgrade your dust blowing bag filter, for a fine filtration pleated cartridge filter. The Wynn is considered the top dog in this game, but there are alternatives. Google Wynn 35a alternatives and you will come up with stuff from several vendors. Good reports on the Donaldsons, but you will need to figure out how to attach to the DC, again Wynn is the champ here... Spend a little bit more and remove the headaches.

The neutral vane is simply a piece of, well pipe that you need to form with a special curve in it that forces incoming air into the dust collector to spin along the outer edge of the separator ring, causing the dust and shavings, mostly to drop out of the air stream before moving on to the filter, this keeps the filter clean longer and keeps it from clogging up. Periodic blow downs of the filter with a compressed air blowgun, or even a leaf blower is all the maintenance your filter will need at this point. Sawdustzone.org member LCHIEN posted up his template for making the Neutral Vane for the Harbor Freight dust collector https://www.sawdustzone.org/forum/discussions/shop-setup-layout-and-design/36139-hf-neutral-vane-pictures-reposting and I believe this should also work / fit directly with the Wen as the only difference I can see between the HF and Wen units is the paint color, and the impeller... 

The branch wyes are from Wood River, which I believe is Woodcrafts house brand. Again prices on these have gone up a bit since I got ime a while ago, inflation and all, but currently at $16.49 that is way less than the nearly $30.00 each Amazon is getting for them, or nearly $50.00 each for the metal ones.

The lowest prices I could find on the aluminum HVAC tape, 5" snap lock duct, and 5" adjustable elbows was all local at Home Depot. I won't post links as your local store, say if you are in Alaska or Hawaii may have higher, or lower prices than mine. My ducting sheet metal parts are not all purchased at Home Depot either. Some of them were what you would consider scratch and dent from local construction sites, 5" seems to be a common branch size on a lot of the houses being built around here, including mine, so contractors tend to prefer to toss and start over on a $5.00 elbow VS. paying somebody $15.00 to straighten it out to use it. Look while driving through the newer neighborhoods, and if you see the stuff, don't be shy to ask!

The 5x4 reducers. I wanted smooth flowing cone reducers. Amazon is looking for $14.40 a piece for the Woodstock International 5x4 cone reducers. Grizzly.com wanted $2.25 + cheap shipping. I went with Grizzly. 

Lastly and this is really a luxury, you CAN use cheap plastic duct strapping, but I opted for proper actual U clamps for my duct work to keep it secured to both the wall and ceiling. 
2 Hole stainless steel 5-1/8" duct straps https://amzn.to/3sf4YNW
2 Hole stainless steel 4-1/3" duct straps https://amzn.to/3h7Bjj8

You will need the following items to complete the install.
I am assuming you have a rivet gun. If you don't  Harbor Freight's $4.99 hand riveter is a great bargain and works fine. https://www.harborfreight.com/hand-riveter-set-38353.html
Along with that you will need an assortment of blind rivets. Again Harbor Freight has the best price on a good sized box of rivets. Many of which you won't need, but the quantity of the sizes you will need are cheaper than just buying a bag or two of just the sizes you need. $6.99 is hard to beat! https://www.harborfreight.com/500-piece-aluminum-blind-rivet-assortment-67668.html

So aside from the remaining issue of trying to figure out how to properly collect the spewing dust off of the sliding miter saw. LOTS of research going on about that. I could design a custom hood for 3D printing, however I would want to sell something like that, and honestly there just isn't that much of a market for a cheap Harbor Freight single bevel sliding miter saw dust collection...

11 July, 2022

3D printing for Shop Safety.

 At some point, not sure when or how, but the little plastic caps that cover the business ends of my mortiser chisels decided to take a permanent break and leave my shop. Most likely got sucked up by the shop vac and are painfully slowly decomposing in the local landfill. Now my mortiser chisel holder holds them in an upright fashion to prvent the auger part of the bit from falling out, right next to my air compressor with the tips of the bits just about forearm / wrist high. Making every single reach for the air compressor on / off switch a bit of an excersize in fear factor.


Not wanting to trade in what years I might have left on this earth for a Darwin award, I felt it best to replace these covers. Unfortunately it's not like these are just an every day thing I can just order on Amazon, oh no they want to sell me the whole chisel set...


But... I DO happen to have a 3d printer, albeit a small cheap one, but guess what, it is perfect for whipping out this sort of thing.


So I go looking on the various STL publishing sites, and sadly nobody has published any print files for these little plastic boxes, but I have calipers, I have Sketchup, and I know how to use 'em...


Design #1. The measurement is there and works well, BUT, only for the 3/8" chisel which I allowed a tiny bit of slop. The 1/2 and 1/4" chisels that I set the inside dimension of the caps dead on to, well, that was dumb.


Design #2. I upsized the 1/4" and 1/2" while keeping the 3/8" cap the way I had it. No joy. Let's try something different.


Designs #3 - 7. Change template in Sketchup from woodworking inches to 3D printing mm. Whip the calipers out again and re-measure everything in MM, transfer the measurements to the drawing. I literally hit the 3/8 cap legth wise dead in the middle... Nailed the 1/2" on the first print, had to fudge around in tenths of a mm to get the 3/8 and 1/4 to fit right but I got it... tenths of a mm, that's not thousandths, but it is an ever so slight nudge...

Well after much trial, fitting, error, fixing, trial fitting blah blah blah, I got them to fit, finally...

I posted the design up on Thingiverse https://www.thingiverse.com/thing:5430191/files so if any of you are up to 3D printing knock yourselves out, I am sharing it with a non commercial attribution license. So feel free to make stuff from it, but don't sell the same said stuff...

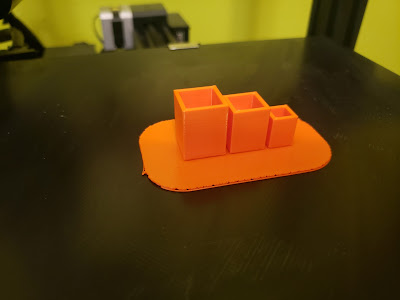
The caps fresh off the printer...

Popping them off of the raft is pretty easy, and again, not super tight, but definately a friction fit, at least with mine. Odds are good that chisel sizes may vary. Heaven knows the Central Machinery chisels are not super accurately machined....

No more gouging my arms, or losing the caps!


So now that I have done this, I am posting this up hoping that maybe someone else can benefit from what I have done here....

07 July, 2022

Some simple inexpensive and VERY useful fence clamps!

For all the years I have been woodworking, I have always had to, well, kludge together a system to clamp things like sacrificial fences and stop blocks to my table saw rip fence, well that came to an end today.

These were ordered from Amazon super cheap, 

The Milescraft 4009 Fence Clamps are at the time of this writing selling for $11.99 on Amazon. As is my habit, I offer to you my Amazon affiliate link if you'd like to support me here at no cost to you by simply using me as, well the referrer for your purchase. https://amzn.to/3ysc1o6

The good, the bad, and the ugly.

Well there is no realy ugly, there is only good and could be a bit better.

The good, 

The come in a pair to the package, and the finish on the aluminum block is typical for Milescraft, and I am starting to amass a bit of a collection of their stuff. Sadly it isn't the beautiful blue of Rockler, or other MFGs, but rather Milescrafts almost trademark hammered silver finish. Not unatractive in the least, but doesn't stand out color wise... 

The fence clamps as just freed from the package!

the castings are exactly what I expect. Threaded L hook in an aluminum block, that is machined for the threads, The casting, and machining are every bit what I expect for, well a hardware store L hook. Nothing special but it serves its purpose. The good thing is this hook in particular is nearly fully threaded until just before the bend, so it provides a LOT of range and solid bite to your fence.
The L hook is nicely made, albeit simple.


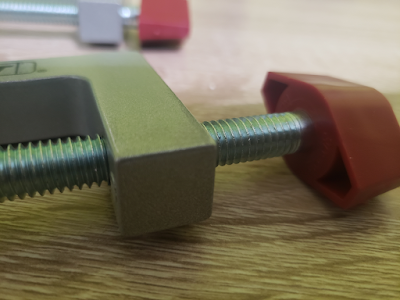
The clamping rod / knob / pad are every bit as well done, and could just as easily been on a Jorenson or other high quality F bar style clamp were it not for the different knob / handle. The clamping pad has non marring pads that match standard woodworking clamps. Should one fail or get lost, these pads are available most anywhere that sells F bar clamps like Home Depot, Harbor Freight, Lowes, and Amzon. and the tightener is a simple plastic knob on the end that is most likely cast  / injection molded in place.


Should you need to replace the pads for your Milescraft fence clamps, OR standard F bar clamps, Amazon has the Jorgenson Pony clamp pads for cheap. https://amzn.to/3NKECL6


Now these were a 2 pack, and both are not 100% identical. As is typical for machined threads, the furthest in threads of the L rod, in the actual aluminum block, on one of them, they aren't bad per se, but they could be smoother. I am sure over time running in and out they will smoothen up, but for now you can definately feel the burrs in the metal as you turn the L hook in and out in the last say 1/4". It's not super obvious but you CAN see it in the pics... I am fairly certain a good wash through with WD-40 and about 5 or 6 in / out sessions of the hook would clean / smoothen that right out!
If you look close enough you can see the slightly boogered thread.

So... Are the perfect? Nope. I've yet to discover any product of any sort that is perfect. Are they good for what they are? You betcha! I've not laid hands on the Rockler units, but I suspect that blindfolded, if it weren't for the different knob types, I would be hard pressed to know the difference.  And honestly, I think the style knob of the Milescraft lets you get a bit more torque on the clamp, probably a good thing.

Is it a good value? Well at $10.00 to the penny less expensive than a pair of the Rockler units, I think I will deal with these not being blue...