For years, and years, and years I have kept my Eathlink account, including the web hosting, so that I could maintain a constant web presence / email address etc...
I have decided that I am going to finally divest myself of that as Earthlink simply is unable to keep up with the changes in broadband in my market. I switched from Earthlink years ago, but maintained the web / email hosting. That is going to come to an end soon. I will be putting my interests online in Blogger format, as well as a few other various sites, and will be maintaining my Google / Gmail account as it seems consistent enough and not likely to change with the whim of whatever my ISP decides to do...
So please ignore my earlier post links to the earthlink pages, they are going away...
31 January, 2014
Workshop Tour 2014
Welcome to my shop tour for 2014!
I used to house my shop tour on one of the Woodworking Forums, but being as I admin a different one, some forums don't want others mentioned etc... It just got to be easier to post it here. I hope you enjoy the tour.
Those that have followed my writing in the past know I can go long winded, so I apologize for my lack of brevity, but I want to provide you with as much useful info as possible.
I have a definite plan for how I want the shop to eventually turn out, and I am getting there, the process has been slow, but I AM getting there.
so please bear with me, as we walk through starting at the man-door and working our way counter clockwise,
and inward so that we end up in the center of the shop.
The door is in what would be the right side as we enter, and immediately we see the safety and control center of the shop.
First Aid kit, fire extinguisher, thermometer, and remote controls for air conditioning and ambient air cleaner are mounted directly to the door. This insures easy access to shop environment control just as I come in the door.
Just above the top of the door frame on the right wall is a simple 18" deep 3/4 in shelf that holds various safety supplies such as respirators and spare cartridges in air tight plastic boxes, box of nitrile gloves, safety glasses, push sticks etc..
Also stowed on this shelf is a box of "Shop Rags In A Box" for various staining and cleaning duties.
The door and trim are waiting to be repainted bright white gloss for easy cleanup and good visibility.
Attached to the left of that shelf are simple spring clip tool handle clips that hold my 3/4" pipe clamps.
Directly below are a series of wall boxes and a pair of, well fancy towel bars for lack of a better term used for clamp storage.
The open wall boxes house my corner clamps, C clamps, and various work / acid type gloves.
A proper mobile clamp rack is in the design phase, but for now there are 2 simple 2x2 bars mounted to 2x4 cutoffs creating basically an overbuilt towel bar of sorts, these hold my collection of F bar clamps, and my mere 2 handscrews.
My quick clamps, and HF quick clamp clones are simply clamped to a piece of closet rod attached to the shelf bracket.
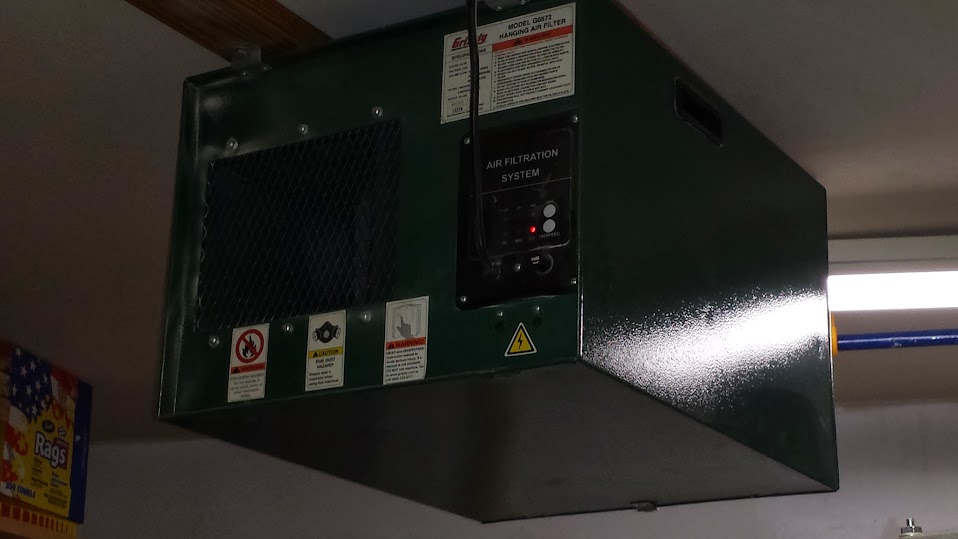
Looking up you see the Grizzly G0572 hanging air filter, and 6 2 tube T12 4 foot light fixtures.
T8 fixtures are in the future plans, but won't be upgraded to until I run out of T12 bulbs and I have several cases in the attic.
Next along the wall is a lumber rack consisting of Closetmaid heavy duty shelf standards screwed into the studs, and 18" brackets.
Not the most beautiful, but the stuff was on clearance at Lowes for less than $25.00 for everything...
Sheet goods for now simply lean up against the wall. A proper rolling lumber cart is yet another shop project on my TODO list.
Next is the area dedicated to Lawn and Garden storage. This will be emptied once I get a garden shed built.
The wall behind all of this has as of yet to be repaired, but is slated to be patched, drilled for blow in insulation, insulated, patched, and painted semi gloss white to insure maximum visibility. This is sthe sole remaining uninsualted wall.
Even with this wall uninsulated, the shop stays warm with minimal heating under the coldest conditions in coastal Texas. Haven't had an opportunity to test cooling under full load yet.
Turn left to the front wall, and you see between the gasketed and insulated garage doors a 13.5K BTU portable A/C unit.
The unit is through wall ducted using 5" dryver vents. The duct from the unit to the wall is insulated using an old fleece blanket for now.
Future plans is to replace the flex line with 5" insulated flex ducting I have leftover from a replacement project in the house.
When the temp dumps to the point we need heat instead of cooling, the job is done with a simple 1600 watt oil filled radiator heater.
The radiator works well, but doesn't cover all that well. I have to stir the air aroud with a box fan to get heat all the way around the shop.
I honestly want to go with a better heater but use it so rarely I don't worry too much about it.
The small stub piece of wall between the doors will be insulated with spray in foam insulation, and sheet rock repaired, then painted, you guessed it, semi gloss white.
Above the AC and hanging from between the door rails is my ladder hanger. I need to make arrangements for a second ladder and move the 6 footer off of here, and put the 10 footer in. Sorry for the mess in the photo, I have since cleaned it up!
Continuing we have a Northern Industrial floor model drill press fitted with a Harbor Freight mobile base.
I set the base wide to stabilize the press and so far it works great!
I am experiencing some sagging in the spreaders and need to redo it with actual hardwood instead of pine. Probably end up using some scrap oak.
I also have a shop made table on it which has been MUCH better than the Grizzly particle board junker I started with.
Turn to the left and he wall we are now travelling down now is what I call the powered wall, this is where most of the circuits live.
I have my 2 clamshell storage cabinets mounted just above the 4' height of the outlets. Below the cabinets is my Harbor Freight 12x36 lathe. The cabinets hold the majority of my hand tools, as well as fasteners such as pnuematic nails, staples, bolts, screws you name it...
The lathe is fitted with a simple plywood shelf that holds my turning accessories.
I plan on building a base cabinet featuring a ballast compartment for 3 80lb concrete sacks, and drawers for my turning tools and chucks, as well a platform and disk to use the lathe as a disk sander. But that is future expansion.
Immediately to the left of the cabinets / lathe is what I call my tool stacker.
Set up similar to the lumber rack on the other side using heavy duty shelving standards and brackets,
I have simple 18x24 inch 3/4 plywood mount boards supporting my bench tools including Ridgid sander, bench top jointer,
planer, 8" grinder with Woverine jig, and scroll saw.
Just to the left of the tool stacker, and above the reverse osmosis system tank is a couple of wall mounted open bins.
The house my extra peg board hooks, as well as. Well... tools for tools. the special spanners etc... for things like table saw, routers etc...
Not installed at the time of this writing, but likely to be within 48 hours is a simple set of 30" heavy duty standards, and brackets and some 24" wide shelves above the open bins.
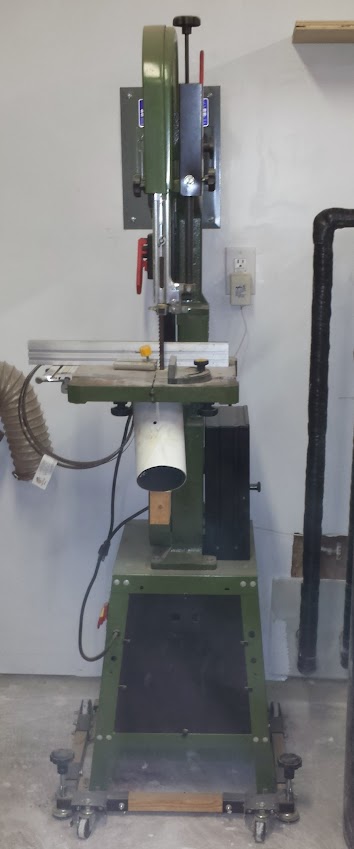
Next is the Harbor Freight 14 inch band saw. I have it fitted with a riser block kit, cool blocks, cobra coil,
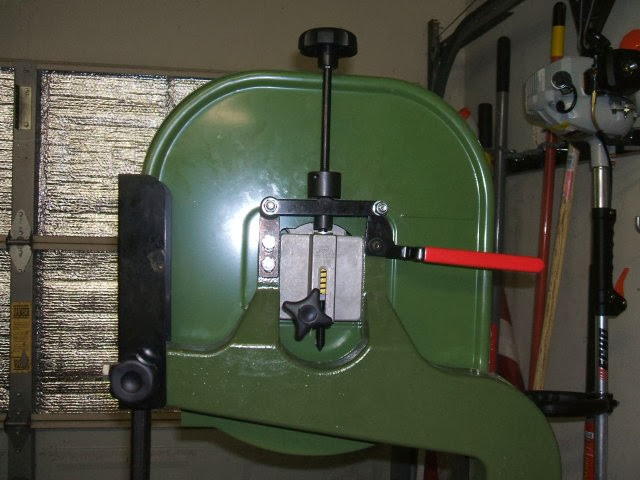
a Grizzly quick tension release from a G0555, and a Craftsman fence. The fence is awful.
This too is on a Harbor Freight mobile base and is working fine.
Lastly on this wall is the Harbor Freight 2 HP dust collector fitted with a Wynn 35A spun bond filter,
that is pulling through a 55 gallon Thien style separator with a side inlet. The duct work is split 5x4x4 using the HF wye, and feeding an upper,
and a lower run. Blast gates are Lee Valley self cleaning aluminum models. It is all sealed up with 3M clear silicone adhesive caulk.
The collector sits on a custom built, and very basic plywood and 2x4 scrap stand made from found woods that were tossed into my yard by Hurricane Ike.
Chances re this was at one time somebodies roof...
Turn left again and you see the Craftsman tool cabinet, with Proto chest. This is my storage for my mechanics tools, screwdrivers etc...
I purchased this new in 1991 to replace a small Snap On tool cabinet that ended up in a friends storage facility when they went bad on the rent...
Keep going down the wall and you will see hidden behind the big bench is the main air compressor. A Harbor Freight 29 gallon 2HP compressor.
I have had it almost 2 years and it has been a beast so far.
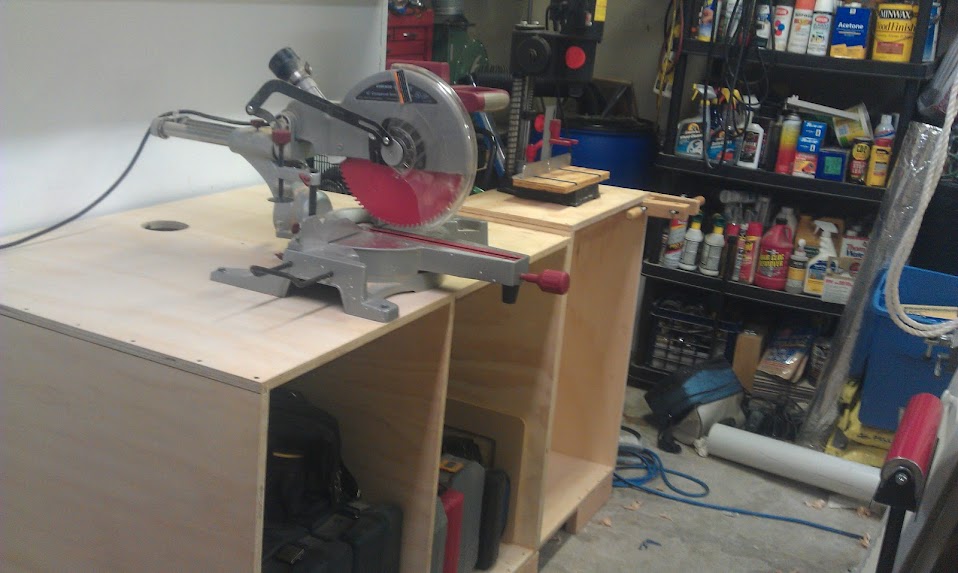
The cabinet is a stepped arrangement holding my Harbor Freight mortising machine, and Harbor Freight 12 inch sliding compound miter saw such that the tables work together.
The section with the mortising machine has a tacked on holder for mortiser accessories, and shelves that hold finishes, strippers etc... It is simply a routed and drilled hunk of 2x4 that is screwed and glued on but boy does it work well!
The main section has a lower section that holds handheld power tools, routers, drills, saws etc...
And a series of drawers to hold saw and router accessories.
Above the cabinet mounted to the wall via a pair of heavy french cleats is a library cabinet built specifically to house manuals,
and woodworking publications.
Originally designed to be open storage, this cabinet is being converted to simple plywood doors to protect the contents.
On top of the Library cabinet is sanding, and finishing accessories including the small parts flocking box and gun, spray guns, etc...
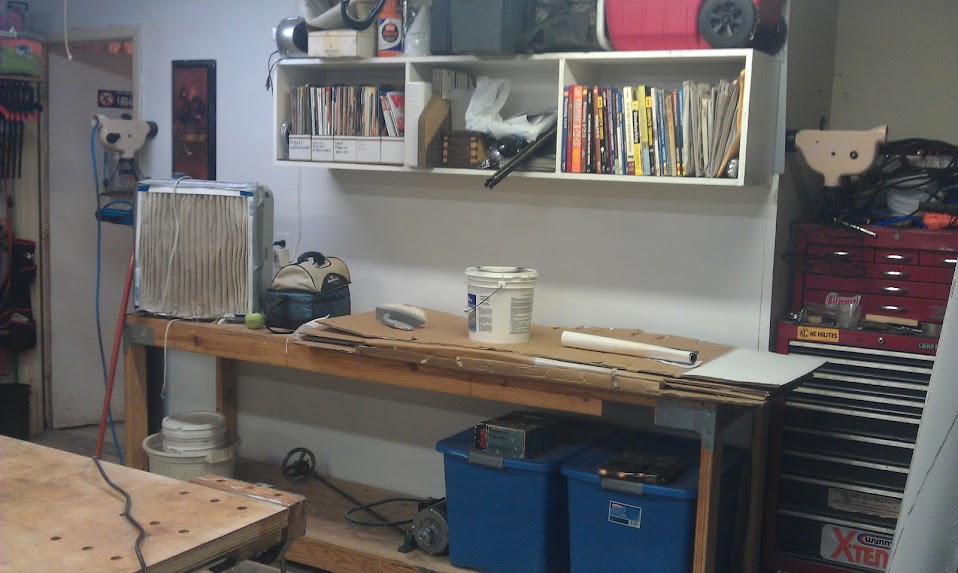
Turn again to the left and now to the center of the shop, and you see the main workbench,
this is a modification of the Fine Woodworking magazine's Get Started in Woodworking bench, with the top built a full 6 feet instead of 5 long.
The height is matched to be 1/8" lower than my Ryobi BT3100 table saw and acts as an outfeed support.
It is fitted with a Central Forge 9 inch quick release vise. It works, but could be better.
This bench is slated to be redone as I am finding a good number of design features I don't care for.
Walk around the bench and you invariably run into the heart of the shop, a Ryobi BT3100 table saw, loaded up with the Wide Table kit, shop made wide table / router table top, shop built router fence, The foot adjusters have been set to completely level this thing off. It is HUGE,
I can crosscut a full 8' sheet of plywood without breaking it down with the circ saw before.
Underneath the extension wing is my 12 gallon shop vac, and 20 gallon Thien trash can cyclone separator.
That pretty much is it for now. A constant spate of storage improvement projects is always in the works, so keep posted here.
I will be updating, often!
I used to house my shop tour on one of the Woodworking Forums, but being as I admin a different one, some forums don't want others mentioned etc... It just got to be easier to post it here. I hope you enjoy the tour.
Those that have followed my writing in the past know I can go long winded, so I apologize for my lack of brevity, but I want to provide you with as much useful info as possible.
I have a definite plan for how I want the shop to eventually turn out, and I am getting there, the process has been slow, but I AM getting there.
so please bear with me, as we walk through starting at the man-door and working our way counter clockwise,
and inward so that we end up in the center of the shop.
The door is in what would be the right side as we enter, and immediately we see the safety and control center of the shop.
First Aid kit, fire extinguisher, thermometer, and remote controls for air conditioning and ambient air cleaner are mounted directly to the door. This insures easy access to shop environment control just as I come in the door.
Just above the top of the door frame on the right wall is a simple 18" deep 3/4 in shelf that holds various safety supplies such as respirators and spare cartridges in air tight plastic boxes, box of nitrile gloves, safety glasses, push sticks etc..
Also stowed on this shelf is a box of "Shop Rags In A Box" for various staining and cleaning duties.
The door and trim are waiting to be repainted bright white gloss for easy cleanup and good visibility.
Attached to the left of that shelf are simple spring clip tool handle clips that hold my 3/4" pipe clamps.
Directly below are a series of wall boxes and a pair of, well fancy towel bars for lack of a better term used for clamp storage.
The open wall boxes house my corner clamps, C clamps, and various work / acid type gloves.
A proper mobile clamp rack is in the design phase, but for now there are 2 simple 2x2 bars mounted to 2x4 cutoffs creating basically an overbuilt towel bar of sorts, these hold my collection of F bar clamps, and my mere 2 handscrews.
My quick clamps, and HF quick clamp clones are simply clamped to a piece of closet rod attached to the shelf bracket.
Looking up you see the Grizzly G0572 hanging air filter, and 6 2 tube T12 4 foot light fixtures.
T8 fixtures are in the future plans, but won't be upgraded to until I run out of T12 bulbs and I have several cases in the attic.
Yes I am aware there is dust on the output vent side
of the hanging air filter, That is what happens when
you forget to turn it ON when you sand drywall!
Otherwise it works great!
Next along the wall is a lumber rack consisting of Closetmaid heavy duty shelf standards screwed into the studs, and 18" brackets.
Not the most beautiful, but the stuff was on clearance at Lowes for less than $25.00 for everything...
Sheet goods for now simply lean up against the wall. A proper rolling lumber cart is yet another shop project on my TODO list.
Next is the area dedicated to Lawn and Garden storage. This will be emptied once I get a garden shed built.
The wall behind all of this has as of yet to be repaired, but is slated to be patched, drilled for blow in insulation, insulated, patched, and painted semi gloss white to insure maximum visibility. This is sthe sole remaining uninsualted wall.
Even with this wall uninsulated, the shop stays warm with minimal heating under the coldest conditions in coastal Texas. Haven't had an opportunity to test cooling under full load yet.
Turn left to the front wall, and you see between the gasketed and insulated garage doors a 13.5K BTU portable A/C unit.
The unit is through wall ducted using 5" dryver vents. The duct from the unit to the wall is insulated using an old fleece blanket for now.
Future plans is to replace the flex line with 5" insulated flex ducting I have leftover from a replacement project in the house.
When the temp dumps to the point we need heat instead of cooling, the job is done with a simple 1600 watt oil filled radiator heater.
The radiator works well, but doesn't cover all that well. I have to stir the air aroud with a box fan to get heat all the way around the shop.
I honestly want to go with a better heater but use it so rarely I don't worry too much about it.
The small stub piece of wall between the doors will be insulated with spray in foam insulation, and sheet rock repaired, then painted, you guessed it, semi gloss white.
Above the AC and hanging from between the door rails is my ladder hanger. I need to make arrangements for a second ladder and move the 6 footer off of here, and put the 10 footer in. Sorry for the mess in the photo, I have since cleaned it up!
I set the base wide to stabilize the press and so far it works great!
I am experiencing some sagging in the spreaders and need to redo it with actual hardwood instead of pine. Probably end up using some scrap oak.
I also have a shop made table on it which has been MUCH better than the Grizzly particle board junker I started with.
Turn to the left and he wall we are now travelling down now is what I call the powered wall, this is where most of the circuits live.
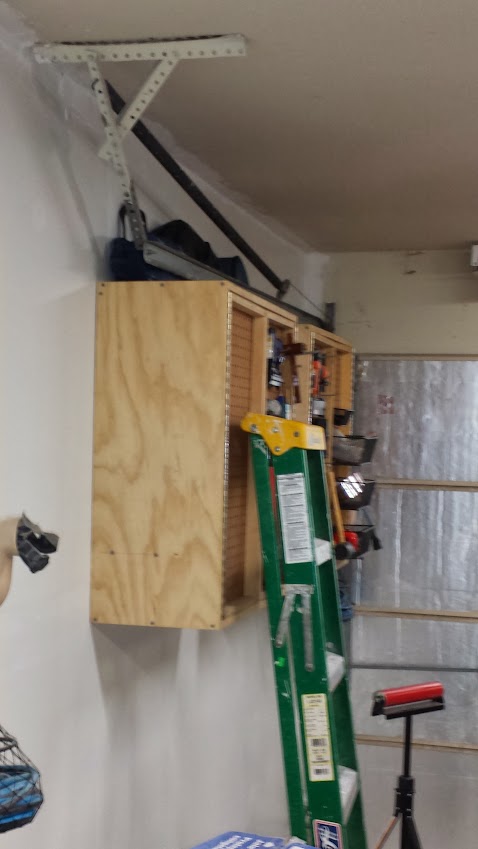
I have my 2 clamshell storage cabinets mounted just above the 4' height of the outlets. Below the cabinets is my Harbor Freight 12x36 lathe. The cabinets hold the majority of my hand tools, as well as fasteners such as pnuematic nails, staples, bolts, screws you name it...
The clamshell cabinets when I first re-hung them.
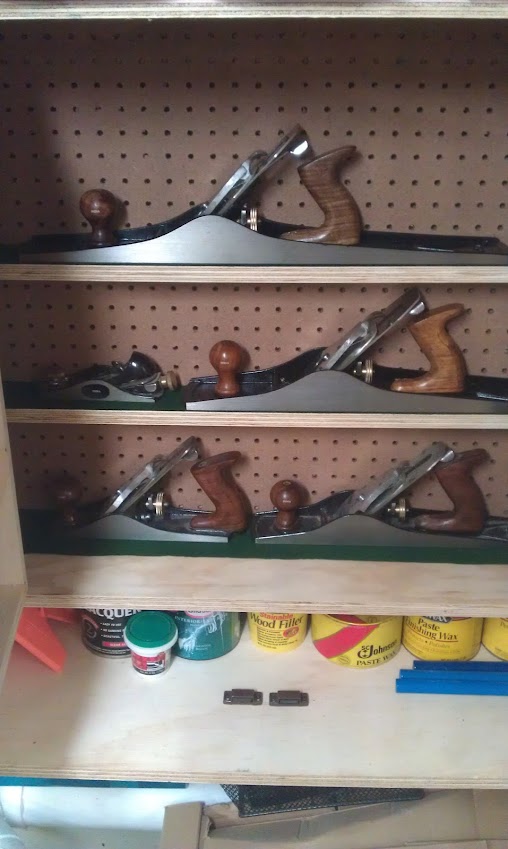
Clamshell cabinet loaded with
my Groz hand planes.
The lathe is fitted with a simple plywood shelf that holds my turning accessories.
I plan on building a base cabinet featuring a ballast compartment for 3 80lb concrete sacks, and drawers for my turning tools and chucks, as well a platform and disk to use the lathe as a disk sander. But that is future expansion.
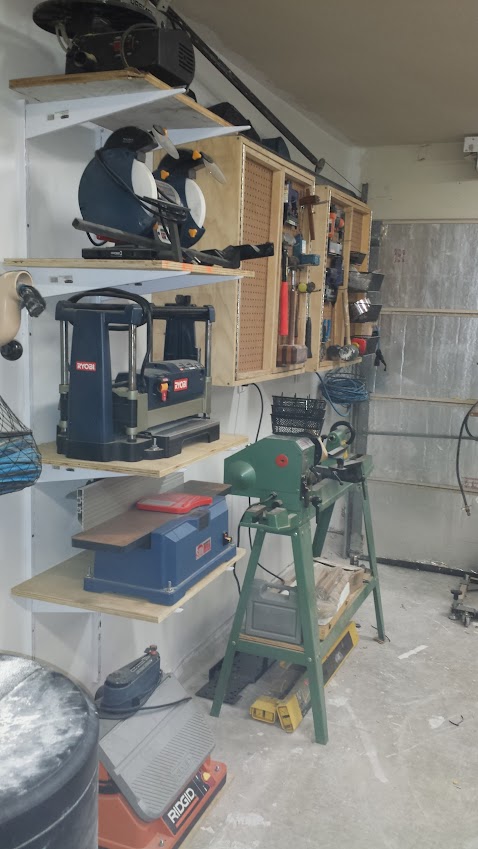
Immediately to the left of the cabinets / lathe is what I call my tool stacker.
Set up similar to the lumber rack on the other side using heavy duty shelving standards and brackets,
I have simple 18x24 inch 3/4 plywood mount boards supporting my bench tools including Ridgid sander, bench top jointer,
planer, 8" grinder with Woverine jig, and scroll saw.
Clamshell cabinets, lathe, and tool stacker
with bench top tools.
The oscillating sander has since been put up!
I have to remove the belt from the sander to put it on here though.
The oscillating sander has since been put up!
I have to remove the belt from the sander to put it on here though.
Just to the left of the tool stacker, and above the reverse osmosis system tank is a couple of wall mounted open bins.
The house my extra peg board hooks, as well as. Well... tools for tools. the special spanners etc... for things like table saw, routers etc...
Not installed at the time of this writing, but likely to be within 48 hours is a simple set of 30" heavy duty standards, and brackets and some 24" wide shelves above the open bins.
The plastic open top bins, useful, but dirt magnets!
Next is the Harbor Freight 14 inch band saw. I have it fitted with a riser block kit, cool blocks, cobra coil,
a Grizzly quick tension release from a G0555, and a Craftsman fence. The fence is awful.
This too is on a Harbor Freight mobile base and is working fine.
The hot rodded Harbor Freight Band Saw.
Grizzly tension release in the release position.
Grizzly tension release in the set position.
Lastly on this wall is the Harbor Freight 2 HP dust collector fitted with a Wynn 35A spun bond filter,
that is pulling through a 55 gallon Thien style separator with a side inlet. The duct work is split 5x4x4 using the HF wye, and feeding an upper,
and a lower run. Blast gates are Lee Valley self cleaning aluminum models. It is all sealed up with 3M clear silicone adhesive caulk.
The collector sits on a custom built, and very basic plywood and 2x4 scrap stand made from found woods that were tossed into my yard by Hurricane Ike.
Chances re this was at one time somebodies roof...
Harbor Freight 2HP dust collector
Wynn 35A spun bond cartridge
Thien 55 gallon separator.
Turn left again and you see the Craftsman tool cabinet, with Proto chest. This is my storage for my mechanics tools, screwdrivers etc...
I purchased this new in 1991 to replace a small Snap On tool cabinet that ended up in a friends storage facility when they went bad on the rent...
Keep going down the wall and you will see hidden behind the big bench is the main air compressor. A Harbor Freight 29 gallon 2HP compressor.
I have had it almost 2 years and it has been a beast so far.
Harbor Freight 2HP 29 gallon compressor
tucked behind mortiser cabinet.
Note the mortising accessory holder built onto
the cabinet side.
The cabinet is a stepped arrangement holding my Harbor Freight mortising machine, and Harbor Freight 12 inch sliding compound miter saw such that the tables work together.
The section with the mortising machine has a tacked on holder for mortiser accessories, and shelves that hold finishes, strippers etc... It is simply a routed and drilled hunk of 2x4 that is screwed and glued on but boy does it work well!
The main section has a lower section that holds handheld power tools, routers, drills, saws etc...
And a series of drawers to hold saw and router accessories.
Old photo of incomplete cabinet, slider, and mortiser.
The cabinet went out of square as glue joints failed.
Working to rebuild that now...
Old photo of mortiser with custom clamp slotted table.
The bench this was on is now in a
friends garage doing automotive duty...
Above the cabinet mounted to the wall via a pair of heavy french cleats is a library cabinet built specifically to house manuals,
and woodworking publications.
Originally designed to be open storage, this cabinet is being converted to simple plywood doors to protect the contents.
Old photo of library cabinet. Ignore the bench setup
that has been changed, but the cab is pretty much the same.
On top of the Library cabinet is sanding, and finishing accessories including the small parts flocking box and gun, spray guns, etc...
Turn again to the left and now to the center of the shop, and you see the main workbench,
this is a modification of the Fine Woodworking magazine's Get Started in Woodworking bench, with the top built a full 6 feet instead of 5 long.
The height is matched to be 1/8" lower than my Ryobi BT3100 table saw and acts as an outfeed support.
It is fitted with a Central Forge 9 inch quick release vise. It works, but could be better.
This bench is slated to be redone as I am finding a good number of design features I don't care for.
Another old photo. The bench is the same, just the
stuff under it changed. The planer and scroll saw are
on the tool stacker now.
Walk around the bench and you invariably run into the heart of the shop, a Ryobi BT3100 table saw, loaded up with the Wide Table kit, shop made wide table / router table top, shop built router fence, The foot adjusters have been set to completely level this thing off. It is HUGE,
I can crosscut a full 8' sheet of plywood without breaking it down with the circ saw before.
Underneath the extension wing is my 12 gallon shop vac, and 20 gallon Thien trash can cyclone separator.
The table saw. Yeah another old photo. Ignore the
bench in the background. That is the one that left a while ago...
That pretty much is it for now. A constant spate of storage improvement projects is always in the works, so keep posted here.
I will be updating, often!
Subscribe to:
Posts (Atom)

