09 February, 2022

The last touches on the compressed air system.


So my last few bits and pieces, some 3/8" MPT x 1/2" Push to connect unions came in today, and I already installed them. I have narrowed down what I have used in my system, and worked out a full parts list for anyone wanting to do an install like mine without making the mistakes I made along the way.

So let's go!

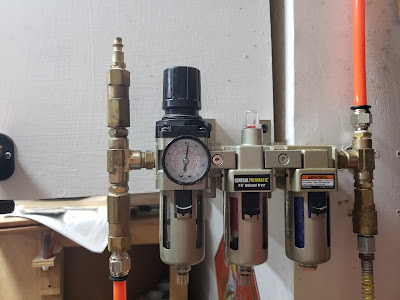
As a refresher, I have a dual compressor system, both Central Pnuematic oil lubricated, 2HP models, one 29 gallon, and one 8 gallon. They are ganged together in a custom manifold that uses a Central Pnuematic 3/8 filter / regulator, FRL connection bracket, and a Central Pnuematic filter / dessicant dryer. 

Harbor Freight is changing lines from Central Pnuematic to Merlin, and I can find no FRL bracket advertised as compatible with the Merlin setup, so if you want to go with Merlin instead of selecting one on say Amazon, just use a 3/8" close nipple.

I went with the dual compressor setup to be able to delivery just over 14cfm at 40psi, which is more than enough to drive anything I am likely to run in my shop, or around my house. Yes a big industrial compressor would be awsome, but that would require a dedicated 30 amp 220v circuit, and a LOT more space neither of which I have or have any interest in adding to my garage workshop.


Now with that being said, let's go through what we have and how we configured it shall we?


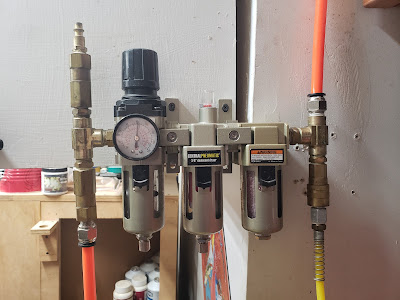
Dual compressor input, regulator / filter / dryer / manifold assembly.

I run the dual compressor setup with one compressor, the 29 gallon, plumbed via the piping sytem to the manifold, and the other via a quick connect to the manifold. These connect through 1/4" NPT one way check valves preventing backpressure or leakage in the system or between the comrpessors. These are in turn assembled to 3/8" x 1/4" NPT bushings, and in turn assembled to a 3/8" FxFxM tee. This tee feeds into my Central Pnuematic 3/8" filter regulator, this in turn is connected via an FRL bracket to a Central Pnuematic 3/8" filter / dessicant dryer.  The first filter does particulates, the second filter removes oil etc...  These each are auto draining. On the output side, another 3/8 FxFxM tee, and from here we connect with the first 3/8" MPT x 1/2" push to connect union to get into the piping system, and on the other output, I use for now am using a Central Pnuematic industrial coupler with a 3/8 x 1/4" bushing. I will be upgrading to a Milton 3/8" MPT unit soonest possible.


My regulator / filter / dryer manifold assembly. The main
components are now discontinued and replaced with the Merlin
brand at Harbor Freight.

So here is the shopping list, and I am aiming for having some spares with best per unit price so adjust as necessary.


  1. First the brass tees. Yes I am linking a 5 pack even though I used 3. These are useful, and, well, it is cheaper this way per unit by a lot. GASHER 5PCS Metals Brass Pipe Fitting Barstock Male Branch Tee T Adapter 3/8" NPT Female x 3/8" NPT Female x 3/8" NPT Male 5pk. https://amzn.to/35RDzsl
  2. Milton S-217 1/4" NPT V Style Coupler and Plug Kit - 6 Piece. This will cover 2 hoses, and the secondary input should you opt to not run it in using the push to connect tubing and keep it mobile, https://amzn.to/3uATpSM
  3. Control Devices P2525-1WA Brass Ball Check Valve, 1/4" NPT Female x NPT Male. You will need 2 of these, 1 for each compressor input. These will require bushings. https://amzn.to/3B3PGyd
  4. T TANYA HARDWARE 1/4" x 3/8" Brass Hex Bushing, Female Pipe x Male Pipe, NPT, Pack of 10. https://amzn.to/3rBRLOU
  5. I used the now discontinued Central Pnuematic, now they have the Merlin 3/8" air filter with regulator. https://www.harborfreight.com/38-in-...tor-58178.html
  6. Again Central Pneumatic, the Merlin equivalent is.... 3/8" NPT (F) Dessicant Dryer filter. https://www.harborfreight.com/38-in-...ter-58180.html

Unlike the Central Pnuematic, the Merlin does not appear to have an FRL connection bracket available. If you can find a compatible unit, use it, if not, just connect them with a brass 3/8" close nipple. The FRL mount brackets were really nice on the Central Pnuematics....

The regulator / filter / dryer assembly can be had in a single coordinated assembly on Amazon for a few bucks more than the Harbor Freight units, but and this is goign to sound funny, this is one area that I know Harbor Freight makes a quality unit, I think you would be better off with theirs. But if you insist on going amazon, here is the lowest cost comaprable unit.... https://amzn.to/35Nk8Rs

Now that we are out of the manifold assembly...


Let's move on to the Compressed air piping system.

My piping system is basically a knock off of the Rapidaire, however I looked at the Rapidaire which was considerably more expensive, and itself required lots of parts added to get the kit where I wanted it, not where they want to sell it...  It is a 1/2" OD nylon tubing push to conneect set whcih came with plentiful fittings, 60 feet of tubing which is way more than I will use in my garage, and some just average couplers and plugs. 

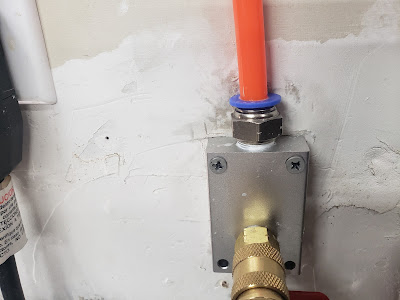
I opted for 3/8" MPT unions, and 3/8" MPT couplers to insure I had full flow from the manifold to the hoses. I know I am going to be restricted by the hoses / plugs, but that is something I am just going to have to live with. I wanted no restriction in the path. This also allowed me to eliminate the use of bushings and the added potential point of failure / leakage.

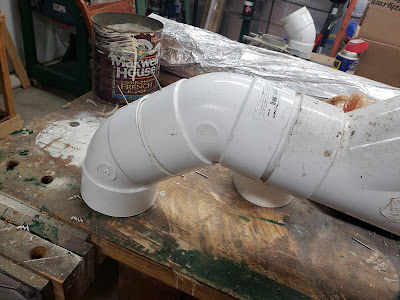
I run the tubing staight up the wall from the manifold, to the ceiling, and make my first bend transitioning to the ceiling. The tubing cut pretty easily with the included cutter, and the push to connect fittings were deemed to be well named by now as they make a good secure connection.


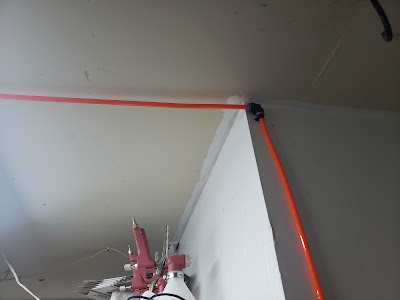
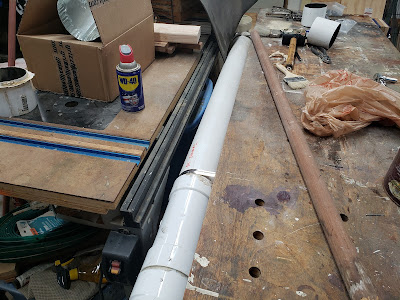
We travel somewhat diagonally accross the ceiling to between the overhead doors, where we tee into the line, and connect to my old Central Pnuematic 3/8" 50 foot self retracting hose reel that is mounted between the overhead door tracks for best coverage of the workshop, and driveway, while taking up minimal headroom. This is an old unit, and the original hose was getting old and started leaking. We replaced the original hose with a Goodyear replacement hose. 


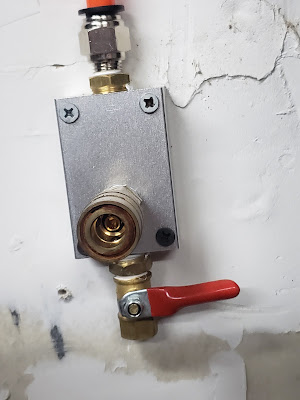
We continued along the ceiling to the front wall, make our second bend to the front wall, and tee down to meet our first outlet block. Both outlet blocks are configured identically. They are Primefit outlet blocks, with the Primefit 3/8" MPT x 1/2" push to connect unions, 1/4" flush pipe plugs, 3/8" MPT Milton couplers, and 3/8" MPT forged ball valves for pressure dump. 


As the tee continues down the front wall to the other side of the overhead door, we make our final bend, to our second outlet block.

Bigatur 1/2" Air Piping System. https://amzn.to/3LgJIyx

Primefit outlet blocks. I used 2. https://amzn.to/3uAdFnd

Glarks 10pc brass 1/4" MPT hex flush pipe plugs. This will close off the unused 1/4" port on the back of the outlet block. https://amzn.to/3GCoNlU

Primefit 1/2" push to connect x 3/8" MPT straight union 4 pack. I used one. https://amzn.to/3oA2Uh3

Antrader 4 pack forged brass 3/8 NPT male x female ball valves 180 degree action. https://amzn.to/3BkAFIB

Milton Industries S-767 HI-Flo V-Style -FeetA,M,V-Feet 3/8-Inch MNPT Brass Body, Single. I used 3. https://amzn.to/3HDwA4u

Central Pnuematic 3/8 x 50ft hose reel. Yes the fittings are 1/4 NPT. So are the hoses. But at least I have full flow up TO it... https://www.harborfreight.com/38-in-...eel-93897.html

NOTE: Harbor Freight appears to be phasing out their pre existing house brands such as Central Pnuematic in favor of their newer lines such as the Merlin Brand, which is reportedly an excellent replacement, but at a higher price point. I am working on a blog post about that move but am not ready to publish it as I am still working out the ideas. The Merlin setup is still less expensive than anything on Amazon though.

Anywhere male pipe threads are, irregardless of factory pipe sealant, recieved several wraps of teflon tape to insure a propoer seal after experiencing multiple failed seal atempts with factory pipe sealed components. 

A spray bottle with soapy water was made up, and once the system was pressurized, EVERY SINGLE JOINT was tested, thoroughly. There are at the time of this writing, ZERO leaks in my compressed air system. 

I still have too many air hoses to think about. both 1/4" and 3/8" ID. The 3/8" ID reinforced polyurethane hoses are far and away my favorites as they are, and stay nice and flexible, are not prone to kinking like hybrid hoses are, and are not super heavy and prone to cracking like rubber hoses are. The disadvantage to the reinforced urethane is that they are not all that abrasion resistant, which is why you never see them in a self retracting hose reel. For use out in the driveway / automotive uses, I pretty strictly use traditional reinforced rubber hoses.

At least in my experience, the hybrid hoses I have tried have simply been the worst of all possible worlds. Poor abrasion resistance, VERY kink prone, very crack prone, the only thing going for them that I can tell is they are lighter than rubber. In my opinion the hybrid air hoses should be avoided at all costs.

06 February, 2022

Thinking about what hasn't worked as well as I had hoped. What to avoid in your shop setup.

So you've seen the shop tours, you've watched countless brag videos on how this or that thing is the best thing since sliced bread...


This is not one of those posts.

On the contrary, this post is to tell you what failed, or at least didn't live up to my hopes. A lot of it is being changed over now, but let's dive right in and hopefully we can get somewhere with this...


#1. My compressed air distribution system. The ganged / dual air compressor setup works great, gives me good max CFM to drive everything I need. The regulator / filter / dryer assembly does what it is supposed to do, how it is supposed to do it. The issues I had were my distribution system relied on, after the output tee of the regulator / filter / dryer setup, I went from 3/8" NPT fittings, to 1/4" so at every fitting we introduced effectively a bottleneck / venturi which is great if we wan to increase speed and atomization of a liquid immediately after, but lousy if I want to maintain volume. The air was distributed with old fashioned rubber hoses that are prone to drying out and cracking, and the overhead hose reel itself was mounted too far back in the shop near the back wall by the comrpessors.

I fixed this by replacing the hoses with a 1/2 push to connect compressed air piping system. Although honestly since pipe is measured in ID and tubing is measured in OD, and this stuff is 1/2" OD they should call them tubing systems. I replaced the 1/4" MPT x 1/2" push to connect fittings with 3/8" MPT x 1/2" push to connect fittings. Sadly the fittings themselves are necked down with a plate that has a 1/4" hex hole in the middle. It took some VERY careful drilling to drill out the plate to 3/8" but my setup NOW has fully 3/8" ID end to end. At the outlet block likewise I upsized the couplers from the standard 1/4" MPT couplers, to 3/8" MPT Milton couplers. They cost a couple of dollars more a piece, but the quality and air flow are worth it.

#2. My old T12 flourescent shop light fixtures were failing. Blowing tubes left and right, flickering, buzzing, and just being a pain. Yep the ballasts were going out.

I could have replaced teh fixtures, but at $20.00 each for cheap ones that I really didn't like, which meant at least $140.00 for new fixtures, or a sale at Amazon for a box of 20 T12 - T8 double or single end powered ballast Bypass conversion bulbs for all of $70.00, I figured I would save 50% and do the upgrade myself, keeping the fixtures I liked. What I wasn't prepared for is just how much brighter the light would be in there. Takes some getting used to.

#3. My dust collector and ducting. Wile many people are fine with 4" mains, I was going to push my DC to as close to Bill Pentz recommendations as possible without going into the ten grand budget territory. I also had my lower run to my workbench and table saw running across the floor causing a tripping hazard. 

How I fixed that? Upgraded the impeller to a Wen 12", removed the Thien separator and using a Pentz neutral vane, long ago tossed the filter bag in favor of a Wynn 35a .5 micron cartridge filter. Upgraded my mains, or more specifically upgradING my mains to 5" and just keeping my final branch runs at 4", this allows me to have ports where I need them.  I have a LONG way to go with this, and am basically tearing out the 4" segments that are going away now. I have the under the bench part moved UP and a vertical 4" running to the ceiling where it will meet up with a branch wye and go into the 5" main. Will likely do a full on post about the ducting once I have it all set up. Probably shoot a video on it.

#4. My tool stacker, just a set of heavy duty shelf standards, and brackets, holding up bench top tools mounted to 3/4" plywood bases meant that I had to lift from over my head for most of my tools, which are not super light, turn which usually meant at least SOME twisting, and then lug the thing to the work bench that put the work surface of the tool too high to actually use well.

My solution for this is also still in progress, and at least 2/3 of the way done. First was the build of the bench grinder / sharpeing station to hold the grinder and griding jigs up solidly and give me a great platform for sharpening my turning tools.  The next step was to design and build a flip top tool cart for the bench top jointer, and lunchbox planer. This is already done and posted in several places. I learned a LOT building that. Thirdly is a second flip top tool cart. This one for the Rigid oscillating edge belt / spindle sander, and scroll saw.  There were LOTS of lessons learned about rushing a job with the first one. On #2, I made certain the lap joints are clean, and tight. No need for screws, although I am planning on at least for the platform to the kick leg using 5/16" dowels, and screws to help secure it though the leg. I am not necessarily Anti Screw, I just want to minimze the amount of hardware for the build. Kind of a personal challenge

#5. My turning tools storage is abysmal. I am keeping them on a plywood platfor on the stand in thier shipping boxes. 

I have some jetissoned drawers from wherever my sister in law dug them up from after Hurricane Harvey. The drawer fronts are really pretty, but the joinery is abysmal. I need to shorten them and am likely to just build out a basic box / cabinet to go above the lathe stands spreaders, and hold my turning tools and accessories. Most likely flock the interior of the thing.

#6. My drill press gobbles up floor space, and really only punches holes. No storage or antying like that. I know over simplified.

I have the Wood magazine plans for the drill press storage cabinet, the kind that rolls over the foot of and straddles the post of a drill press. Now my drill press is on a Harbor Freight mobile base. I need to modify both the base by narrowing it up, and using 2x6s as a platform for the drill press, AND modify the cabinet plans. I am hoping to be able to store all my drilling jigs, and accessories in there, including my hand held drills in their cases being hung from hooks on the sides of the cabinet.

#7.  My table saw and router table parts and accessories are jammed willy nilly into a single tote making it very hard to find the right thing when I need it. 

This is a ways down the road, but I am working on designing a proper mobile base / cabinet for the table saw, with a router enclosure, and organizer / storage drawers. And pull out blade organizers. This is not super high on the list, but it IS on the list... And will likely be done as 2 separate boxes. The box immediately under the table saw, and the box under the extension wing / router table...

Well that's is. I am sure there is more, but that is all I can think of to write about today. 

I am making a video of my build for the flip top stand. Once I get that published I hope you will check it out on my youtube channel!

05 February, 2022

Shop updates progress.

Shop updates progress.

So in late December, I gave a list of shop upgrades, where I was with them, and what was left to do. At that time, what was left pending I beilieve was...

  1. DC duct move / straightening. This is in progress.
  2. Install the band saw tires.
  3. Compressed air hard piping. I have all the stuff and have started installing the outlets.
  4. Lighting. This is for safety and energy efficiency. I need to buy the bulbs.
  5. Finish the miter saw cabinet drawers and doors.
  6. Blown in insulation. I may have to farm this out, but it shouldn't be too terribly expensive.
So let's handle the items one at a time and give you an idea of what is happening.


DC Duct move / straightening. 

I've never been truly satisfied with the way my current dust collection piping setup is run, and I am in process of taking the parts down that bother me, and re-routing them. I am replacing the 4" main duct with 5" which is the maximum size my dust collector is made for, and running, at least for now, until I branch, so for example the workbench and table saw area have an upper, and a lower run. I am running the 5" duct overhead, and branching where the workbench / table saw extension table begin, in order to accomodate pulling from both lines at the same time. 

The first section of 5" being run. I have since tightened up the
hanger and the angles are now correct.

The 4" being reconfigured, yes I know I am hard on my workbench
The joints are locked together with pop rivets for semi
permanence but can be taken apart if needed.

The run between the workbench and the table saw is DONE!

Due to working with what I have, and what is available on the market, I am using a mix of 4" DWV PVC, 2.5"m 4 and 5" ABS plastic dust collection fittings including 5x5x5 ABS branch wyes, and 5x4 ABS duct reducers, and of course 5" snap lock duct and 5" sheet metal adjustable elbows.

I am haing to cut down some of the DWV as I used to have it literally accross the floor, and needed to remove about 4 feet of pipe to make the configuration change. Cutting this on the miter saw without dust collection was honeslty a messy affair. 

The joints on the assemblies that need to be permanently connected, are being drilled and pop riveted. IF for any reason I do need to dissassemble, for example I sell this place and need to relocate, OR I finally build that outbuilding workshop by some miracle of finances, I will be able to drill out the rivets and be good to go.

Sealing of the joints will take place when everything is in place and will be done with aluminum HVAC tape. The metal 5" run shown above has already been done, I honestly need more tape. I will also be taping the seam of the split lock to prevent air incursion from there.

Why did you go with 5" when there are people doing 6" upgrades with Harbor Freight 2 HP dust collectors and Cyclones?

I've worried myself to pieces over this, and had more than a few excitable debates with various fellow forum members on many woodworking forums about this. Many say just pitch the Harbor Freight unit all together, but a true full on proper cyclone and pipe it for 8". Those same folks don't ever volunteer donations to that end.  But the other advice teeters between 5" to get the most out of what my collector was designed for, and upsizing including the inlet in the impeller housing to 6" as 6" will move more air, and that is absolutely true. 6" WILL move more air than 5", quite a bit more. Let me show you the difference between 4" and 5", and you might be able to guess how much different 6" will be...

4" x 2.5" ABS Branch Wye L, 5" x 5" ABS Branch Wye R.

Lastly, the warnings I have seen RE: the loss in static pressure (vacuum) using 6" with a 2HP blower. And YES I know companies like Grizzly etc... have 6" ports on 1.5HP dust colectors, but I am honestly trying to do as much of the Bill Pentz approach as I can with what I have. 

A reminder of the modifications to the dust collector.

In order to accomplish the goals and go with the recommendations, from Bill Pentz I have done the following.
  1. Remove and discard the terrible filter bag that just makes the dust collector a dust pump, and replace it with a Wynn cartridge filer. Mine is a MERV15 35A and is well over a decade old.
  2. The Harbor Freight / Central Machinery 2 HP dust collector has a motor and impeller housing that will easily handle a 12" impeller, but they ship with a 9.75" impeller. I upgraded mine with a Wen 3403-22 Turbofan (impeller). The swap was quick and easy, although I have seen 2 reports on the Redditt woodworking subforum where owners managed to break the flange trying to pull the original impeller. I am assuming this is a casting quality issue with the OE impeller. They were both newer gray machines unlike my old green model. Be prepared to get creative to get the original out if the flange snaps. Once out though, the new one goes in easy...
  3. Neutral Vane. This is basically a piece of duct extension in the inlet ring of the bag holder on the dust collector, it keeps the air moving in a cyclonic motion, and allows dust and chips to fall out of the air stream before it goes up to the filter, keeping the filter cleaner. It is nowhere near as effective as a true separate cyclone separator, or a Thien cyclone. I love the Thien cyclone, I am a big proponent of the Thien Cyclone, HOWEVER separators take a big hot on airflow, slowing your CFM down quite a bit. So I opted for the Neutral Vane Since it does not separate quite as well as a dedicated separator, I take my blow gun on the air compressor, and blow down my filter after every single use... So far so good. The plans for the Neutral Vane for the Harbor Freight or similar sized / cone ramped dust collectors can be found in the post on Sawdustzone.org by LCHIEN. Give him props for his fine work and sharing it please!
 

Install the band saw tires. 

These were a Santa needing to be cost effective with his elves sort of Christmas gift, but desperately needed as my originals are cracking causing a bumping of the blade as it travels. These are inexpensive on Amazon, and a good upgrade to any of the cheap relatvely speaking, Chinese 14" band saws. But yeah, the install hasn't happened yet. I need to do it, but just have had other things going on. Definately go with Polyurethane tires as they are smoother, last longer and far less likely to end up cracking and causing bumping and / or tracking problems.

Compressed air hard piping.

Done.

The system is installed and working. And I am loving it. Another Christmas gift upgrade. I have been wanting a piping system since I started building the shop. It makes air avaialble anywhere in the shop I want it without tripping over hoses. 

The heart of the system is my Central Pnuematic 29 gallon compressor,
I am piped straight out of the regualtor to the piping system with a ball
valve to cut off flow in case of a problem.

I updated my connections to the mainfold setup with the secondary
regulator, filter / dryer, and I have updated since this photo, to
3/8" MPT x 1/2" push to connect fittings to insure full air flow.

Run up the wall, and accross the ceiling, I have since secured
the tubing with tubing clips.

My previously existing overhead hose reel was moved all the way
forward to between the overhead doors. Careful plumbing keeps
everything out of the way of the door tracks / hardware. Sadly this
hose reel, and ALL of them I could find only had 1/4" fittings. 

The outlet block has been reconfigured since this
picture, again to insure full airflow, I got rid of the
bushings and 1/4" MPT pieces, and went with 3/8"
MPT parts, including Milton 3/8" MPT Type V,M,A
couplers. I LOVE my Miltons!


To do.

Finish updating 1/4" MPT x 1/2" push to connect fittings to 3/8" MPT x 1/2" push to connect fittings. I still need one. The fittings came with a restrictor / baffle type plate that reduces the airflow to a 1/4" hex hole for some unknown reason. I managed to drill out 2 of them to 3/8" to return the fittings to full diameter and not be a restriction.  However overdrilling and punching out the spring retainer and the plastic clip is WAY too easy. The fitting MFGs need to redesign these to insure they are made for full flow / diameter of the tubing. The 2 fittings I did manage to get right do not leak. I have another pack of them on the way.

Both outlet blocks have the previously mentioned Milton couplers, and oh boy are they nice. I do however still need one to upgrade the outlet at the manifold by the air compressor. 

Lighting.

The 48" shop light fixtures were blowing T12 tubes, which are hard to come by nowadays, at a freakishly fast rate. I did a ballast bypass upgrade on all of the installed fixtures. These are double ended ballast bypass LED tubes. The amount of light they output is much higher than what the flourescent tubes put out.


Miter Saw Cabinet Drawers

The miter saw cabinet drawers are kind of on hold. Not super important although I need to get it done, but just not super high priority.

Blown in insulation.

Nope. Not yet. This is a time and budget issue. I just don't want to move the stuff against that wall yet...

Not on the prior list. What's been done, what else needs to get done.

Done.

A post was already made on this, but I made a quick and ugly bench grinder / sharpening station, and a flip top tool stand. I have already started on the second. The thought process is I do NOT want to drag my bench tools on and off of, well, anything.

The sharpening station has been moved since this pic to
immediately at the overhead door. I like it better there...

The flip top stand is a VERY basic 2x4 and plywood design.
I am in process of building a second one for my sander / scroll saw.


To do.

  1. Finish up my second flip top stand. Need some more 2x4s, Too cold to go get it today.
  2. Finish up the migration to 5" ducting for the dust collection.
  3. Build a box to house 2 salvaged drawers as a lathe tool storage, and of course moun it above the spreaders on the base of the lathe stand, build and install a ballast enclosure under the spreaders with levellers, and retractable casters.
  4. Build a base cabinet for the drill press that provides storage for my hand drills, drill bits, hole saws etc...