My compressed air distribution system is done!
Okay I have written blog posts in the past regarding my compressed air system, including chasing down leaks, and other issues. It has taken over a decade, life happens you know, but I have finally finished my compressed air system to where I want it!
What was the goal I was trying to get to?
Simply put, I wanted a compressed air system that would allow me a reasonable buy in cost, with the ability to move an air compressor around in a portable fashion, while providing a LARGE amount of airflow, thus a dual compressor configuration, and outlets distributed through the shop, 1 at the back wall, 2 at the front, either side of the right side overhead door, and a self retractible overhead hose reel mounted in as unobtrusive a manner as possible. I wanted it RELIABLE, and LEAK FREE. And I wanted enough hose paying out from the hose reel into the driveway that I can work anywhere, on any car in the driveway without having to add a second hose. This meant moving the hose reel to the front of the shop.
Why did it take so long?
Honestly, Issues with the initial setup didn't become apparent until after years of use, nd I didn't know all the options.
I had intended for years, including a VERY long time Amazon Wish list to have copper pipe, and fittings to build the system out. But copper pipe and its fittings were EXPENSIVE, and involved flame soldering to make the connections properly. Not very adjustable once installed, and, not particularly reusable if I decided to, or was forced to by SWMBO into moving the shop into a dedicated outbuilding / shed.
I was COMPLETELY unaware of the Polyurethane compressed air piping / push to connect fittings systems on the market. The only options I knew were avaialble were metal pipe, which is expensive, and hard to work with, or PVC pipe whcih is cheap, easy to work with, and could potentially be deadly when a pipe fails and throws shrapnel all over the shop. Neither of which were a good option.
I had heard about Rapidaire systems, which were less expensive than copper pipe, but still several hundred dollars worth of material. Even their "Master Kit" only included a few paltry fittings, although they included at least 3 outlet blocks, but the other costs of getting enough fittings, the original outlay cost of the kit, etc... added up to about twice what I was comfortable with paying.
So in the mean time, I had used Goodyear rubber hoses to make my runs, and honestly even that was a bit costly so I kept them short with custom made lengths to get the hoses I needed. The problem is the rubber air hoses develop leaks after a few years of use, and overall are not really reliable.
Now mind you, a good amount of what I used to complete my compressed air system was carried over from what was already in my shop, what I had salvaged from other projects that were tear downs including a former automotive garage I worked at decades ago, they were tearing out the shop to put in a convenience store. So I did NOT actually have to pay for a lot of this stuff other than sweat equity to reclaim materials that otherwise would have gone to waste.
And then Black Friday / Cyber monday happened, and the opportunity to get the kit, and few remaining pieces to complete the setup for WAY less money than just the cheaper kit would cost normally hit, and my wife wanted to know what I wanted for Christmas. I've never been so happy to want something cheaper than a pair of inexpensive dress pants for Christmas!
So the components used were... I will link the least expensive versions of the items available online that I can find. Brands may differ from my actual used versions.
Central Pnuematic 29 gallon 2HP oil lubricated air compressor. https://www.harborfreight.com/29-gallon-2-hp-150-psi-cast-iron-vertical-air-compressor-61489.html I've had this about 10 years.
Central Pnuematic 8 gallon 2HP oil lubricated air compressor (discontinued, McGraw 10 gallon seems to have replaced it in the Harbor Freight Lineup) https://www.harborfreight.com/10-gallon-oil-lube-portable-air-compressor-58144.html I've had this maybe 12 to 14 years, don't recall...
Both compressors have had 1/4" street elbows, short lengths of brass pipe, and ball valves for tank dumping installed since 2014. This allows for dumping collected water from the tank and depressurizing without fishing around under the compressors...
Central Pneumatic automatic hose reel with 50' rubber air hose. Hose replaced in December 2021 with new Goodyear hose. https://amzn.to/3EUjdKU This was originally set up in the back of the shop in maybe 2012? Not sure...
Large assortment of Central Pnuematic Brass Industrial Quick Coupler Sets: https://www.harborfreight.com/brass-industrial-quick-coupler-set-4-pc-68241.html?_br_psugg_q=quick+coupler+set These have been acquired over the years, but the newest were bought in maybe 2014...
2 @ Control Devices P2525 one way ball check valve 1/4". https://amzn.to/3pSQbaf This was the manifold build in 2014
2 @ 1/4" FPT brass barstock tee, https://amzn.to/3pT4Gen This was the manifold build in 2014
3/8 x 1/4 brass hex nipples / reducers. https://amzn.to/3EWCyem This was the manifold build in 2014, and I believe these came from the service station tear down job when we dismantled the garage before they built in the c store...
Central Pneumatic 3/8" regulator with filter. https://www.harborfreight.com/38-in-nptf-air-filter-with-regulator-58178.html This was the manifold build in 2014
Central Pnuematic 3/8 Dessicant Dryer with Oil Removal Filter. https://www.harborfreight.com/38-in-nptf-desiccant-dryer-and-filter-58180.html This was the manifold build in 2014
Central Pnuematic 3/8" Connector Bracket. Discontinued, no replacement. Use a 3/8" brass close nipple instead. This was the manifold build in 2014
1/4x1/4 brass hex nipples. https://amzn.to/3pViwwU These were from the service station teardown.
Bigatur Air Piping System 1/2”. https://amzn.to/3HvP8Dd
Beduan Push to Connect Fitting, 1/2" Tube OD x 1/4" NPT Thread 10 pack. https://amzn.to/3pT5Vu3
Since the Bigatur kit didn't include them, 2 @ outlet blocks used up front are Primefit 3/8 Push To Connect outlet blocks. https://amzn.to/3313v3h
1 pack 4pcs 1/4” ball valves. https://amzn.to/31m0w58 These were from adding the dump valves to the compressors, so 2014 time frame.
1 pack 10pc 3/8 to 1/4 NPT brass bushings. https://amzn.to/3JEo32A I needed to order a fresh bag of these. I was down to one...
1 pack 10 pcs 1/4" MPT brass hex pipe plugs. https://amzn.to/3EPMN4o Fresh bag. I had none.
10' custom made rubber air hose to connect 8 gallon compressor to keep it portable.
Now with the parts set up, let's explain the plumbing setup.
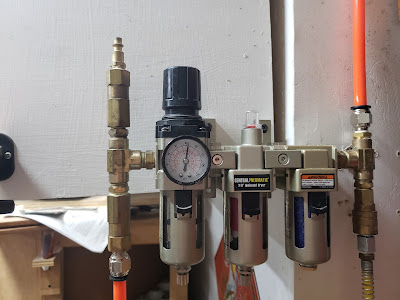
First off, I need to explain the "Manifold Assembly", it features largely to collect, regulate and clean, and distribute the air
My entry for June 6 2014 explains the setup of the manifolds, tees, valves etc... and is available here.https://www.daves-workshop.com/2014/06/clearing-air.html BUT let me summarize it for you.
Quick connect into one, and push to connect 1/4 thread coupler into the other check valves.
Check valves into the first tee.
Tee into 1/4 x 3/8 nipple, and threaded into the inlet side of the regulator.
Regulator via 3/8 Coupler connected to the filter / dryer. Air coming out of this in theory will be clean, oil free and dry. Safe to use to spray finishes.
Output side of filter dryer assembly out via 1/4 to 3/8 nipple into second tee. One side (Down) gets our first outlet, a Quick connect. Second side gets a 1/4 push to connect fitting.
Now the manifold assembly is done being described. Lett me back up to the air compressor(s)
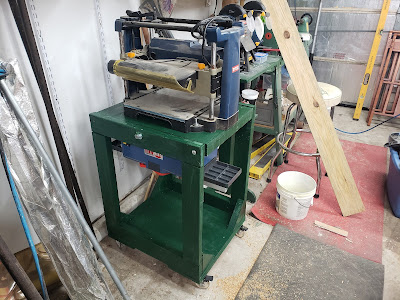
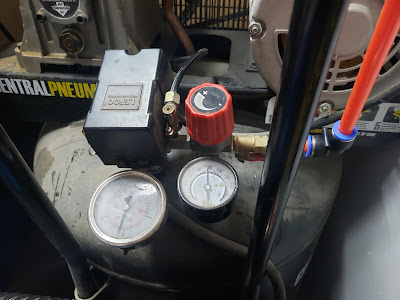
The 29 gallon compressor stays put, so the quick connect from its built in regulator is removed, after the regulated pressure is set to 100 psi. I never plan on exceeding 90psi, but want to fine tune at the manifold.
The Central Pnuematic 29 gallon air compressor with too much evidence that I haven't used my dust collector often enough! I need to fix that habit!
A 1/4" MPT push to cnnect is screwed into the output of the compressor, and then a piece of the 1/2" PU tubing is sized up and connected. There first connection done.
The 8 gallon compressor has a factory fitted quick connect, a shop made / reclaimed section of rubber air hose with a male, and a female quick connect setup, connects from the compressor, to the secondary intake of the manifold.
The advantage of this is I have compressor output of just shy of 16cfm at 40psi, well beyond what I will need, and at a FAR lower cost, and space hit than a giant 60 or 80 gallon compressor!
Of course the "Manifold assembly is in there, all adjusted up and happy. psi at the compressor, 90 PSI at the regulator / filter. Not shown is the input from the 8 gallon compressor. It is sitting coiled up and only connected when needed.
The Manifold assembly. This took some time a long time ago to set up. Harbor Freight has discontinued these pieces in favor of a newer brand. By the time these die, they will likely be on to a different brand again.
Now on to the output. At the push to connect I sized up a piece to go between the coupler, and an elbow to make a tight turn at the ceiling. A couple of screws through some straps into the stud at the corner secure the tubing up the wall and we now make our way across the ceiling, THROUGH the purpose drilled hole in the shop light mount, and we periodically attach via straps and screws into the studs securing the air line on its journey across the ceiling. I did have a temporary location where the hose reel WAS, so in order to avoid wasting air tubing, I used a coupler from the kit to connect and extend the tubing.
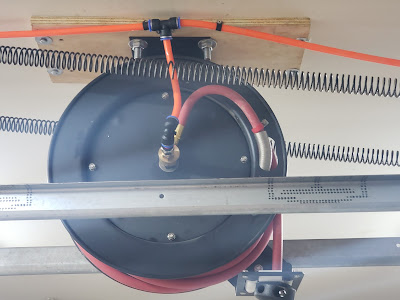
The hose reel and its 3/4" plywood mounting board was moved from the back corner of the shop, forward about 10 feet or so to the space on the ceiling between the overhead door tracks. The tubing is split with a tee from the kit, and is secured as much as possible, INCLUDING using a length of Gorilla Tape to keep it from getting hung up with the overhead door hardware. There is NOT a lot of clearance here, and I do not want to cause problems. This is securely fastened using 1/4" lag bolts directly to the rafters.
The old Central Pnuematic hose reel with a new Goodyear hose. This has been a GREAT item in the shop. Makes easy work of taking out and putting up the hose! The fit is close, but gives me a couple of inches of room for the door to operate.
We ran another segment of tubing from the tee, to the front wall, where we meet an elbow, and another Tee via short section of tubing. This elbow goes down to the first outlet block. Will describe the assembly further below as they are both the same.
The line at the tee was extended to the outside wall, and turned with a final elbow from the kit. Occasional clamps and screws along the wal, and turned down to the outlet blocks.
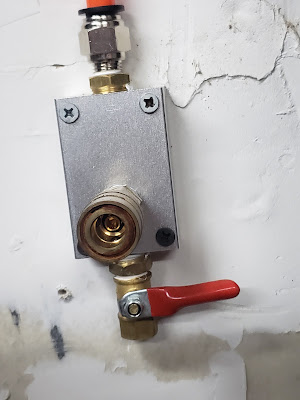
The outlet blocks have 4 holes in them. 1 1/4", and 3 3/8". The 1/4" is on what I consider the back side of them. I pipe sealed and installed a 1/4" pipe plug in there. The other three holes were filled with pipe taped 3/8 to 1/4 bushings.
The top hole got the push to connect fittings (see why I bought extra?).
The front hole got 1/4" hex nipples, pipe taped, and then the quick connect couplers. You could save some time and MAYBE money by going with 3/8" MALE threaded quick couplers, but I had the female ones already. The steel quick connects that came with the kit also are female threaded with no nipples to install which I found quite odd.
The bottom hole got outfitted with the 1/4" ball / dump valves.
The dump valves should NOT have any moisture trapped as the air should be clean and dry before it gets there, BUT it does help depressurize the system if the valve at the compressor is turned off.
The outlet block assembled and in use. That ball valve can easily and quickly dump pressure from the lines if needed. NO the drywall behind it isn't finished right. Nor do I care... It is a garage after all.
I have finished the connections and pressured up the system, compressor to 100psi, and manifold regulator to 90psi yesterday, there has been no drop whatsoever on either gauge in the last 24 hours.
I do need to add a couple more of the straps from the kit, with some drywall screws to retain the tubing to the ceiling / wall where it sags a touch, but it isn't any additional outlay of money, just some time, and it can happen after the rest of the shop gets finally cleaned up.
But in the mean time, I have a spot, more or less anywhere I am working in the garage to plug in an air hose, and I have WAY more than enough air hose to run it out to anywhere around any car in the driveway.
What's next?
Well, since I am still knocking my brains out trying to clean, and reorganize my shop, so that I can finish building stuff for finishing the home remodel, and I have (almost) all the parts, I will finish the re-routing of the 4" dust collection main. I have the wall brackets, and fittings I need to make it happen, and I want the run straighter, blast gates easier to get to, and a LOT less flex hose in the mix of things.
The other Christmas present I got was a set of Polyurethane bandsaw tires for the Central Machinery bandsaw. I will be upgrading those AFTER the shop cleanup is done.