In order to help get, and keep things organized, clean, safe, and efficient, I am in progress on, or am in the planning phase for the following shop ugrade projects.
Dust collection.
I am unsure of where I am with what I have said on my blog about the current configuration. So here goes.
I have a Central Machinery 2HP 70 gallon dust collector. The older green model, not the current gray one. Updates to this dust collector in order to get it up to par, and as compliant as possible with the advice of Bill Pentz, the guy that poured years of engineering expertise into dust collection, I made the following upgrades.
- Wynn 35A .5 micron pleated cartridge filter.
- Wen 3403-22 "Turbofan" A.K.A. replacement impeller. The OEM impeller was 9.5", the new Wen impeller BARELY fits in the impeller housing, and is a full 12" diameter.
- Neutral Vane. I used the pattern from LCHIEN at Sawdustzone.org. I simply had the pdf file printed out full size at Office Depot since it was bigger than my printer could do... Unlike lchien however, my neutral vane is secured via a short rivet, his floats. https://www.sawdustzone.org/forum/discussions/shop-setup-layout-and-design/36139-hf-neutral-vane-pictures-reposting
- Removed the Thien 55 gallon external drum separator. Mind you, the separator works amazing, but it took a huge bit out of airflow performance to the system downstream. It was still more than enough to keep dust in suspension, but I wanted more airflow, more vacuum. IF separation is insufficient using the neutral vane, I will make and install a Thien baffle, IN the seprator ring in the dust collector. Simply put, I have zero interest in a secondary stage at this point, due to the risks from potentially sucking up sparks into a dust bin, and not seeing smolders, AND the reduction in airflow. You never know when you will hit a hidden nail you failed to catch with a metal detector right?
Once the external separator was removed, I removed the 5" flex hose. in favor of 5" HVAC elbows set to 45 degrees, and a segment of smooth 5" metal HVAC pipe, this is run to the 5x4x4 splitter that was OEM from the HF DC, and there are 2 4" mains, one at the floor, one across the ceiling. The 4" mains are a mix of DWV PVC pipe and fittings, with a few dedicated ABS dust collection fittings, and aluminum blast gates. To accomplish my reconfiguration goals, and to remove the bits of ribbed flex hose to make the connections, I need 4 more slip x slip 4 inch 45 degree elbows. Need a trip to Home Depot as I can buy all 4 I need for less than I can order 1 online...
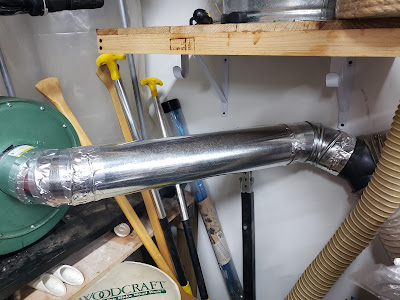
The connections to the 5x4x4 are currently made with 4" flex hose. I am planning on making my connections to the mains using 45 degree elbows in order to make smoother transitions, and move the floor run up mid wall. I am pending delivery of 4" U clamps. So far even with the ducting as it is, air flow and suction and flat out awesome considering that it is a Central Machinery 2HP Dust collector.
LONG TERM. I am reviewing data from several users that have done the math, and shown the speed drops at various distances, and am on the fence between going with 5" single main, OR a 6" single main. My entire run is around 20' and it is pretty straight... Either way I go, I am planning on using HVAC ducting / fittings as dust collection spiral stuff is astronomically priced.
Compressed air:
After all these years, my cotton reinforced rubber hoses are cracked and leaking. I replaced the hose in the hose reel, but I need to pipe the workshop.
I am using a Rapidaire knockoff system that I got for Christmas. I will keep the one quick connect port at the outlet of the manifold for use at the back of the shop, The quick connect on the hose that currently feeds the output to the hose reel will be reclaimed as I will hard pipe it in, as well as the input from the 29 gallon compressor. I will leave the 8 gallon more easily disconnectable in order to facilitate taking it around the property, or to a remote site for work as needed.
I have removed the ladders and jettisonned them to the back yard, and will be moving the overhead hose reel to between the overhead doors.
Coming out of the compressed air manifold, I will be going across the shop roof to a T fitting, with the leg shooting over to the hose reel where I will make a solid connection there, no quick connect.
At the front wall, I will be connecting an outlet block with a quick connect, and a dump valve between the overhead doors, and at the overhead door on the wall sort of next to the lathe.
This configuration will give me EASY hose accessibility to my pnuematic tools anywhere I need in the shop, along with an additional at least 14 feet of available hose from the hose reel out to the very end of the drivewall, all around the cars.
The bandsaw:
I have made the following modifications to my Central Machinery 1HP 14" 4 speed woodcutting bandsaw.
- Central Machinery mobile base.
- Central Machinery riser block kit for a total of 12" of resaw.
- MLCS paddle safety on / off switch.
- Grizzly G0555 tension release mechanism.
- Carter Cobra Coil
- Accura ball bearing blade guides. I originally go the Micro Adjustable set to fit the Delta, the upper guide post mount does NOT fit the post for the Central Machinery. I could get a nice bushing made, but instead the yoke turned out to be a perfect fit, so I took the yoke out of the CM upper guide, and swapped in the Accura yoke. So no micro adjust, BUT I have the bearing guides and it works awesome.
- Carter wheel brush.
- Jet lower blade guide dust port. The CM OE port was sized for like a 1.75" hose, whatever the tiny shop vac hose is, and it would NOT fit my 2.5" hose. I got the Jet unit that fits the 2.5 hose and mounts using the OEM holes. MUCH better pickup.
- Lower wheel guard 2.5 inch dust port that collects dust immediately under the wheel brush.
- Craftsman universal bandsaw fence. I HATE this fence, but it IS better than nothing.
Pending upgrades to this band saw to get it 100% where I want it.
- Replace deteriorating OE tires with polyurethane tires. Recieved them for Christmas, just need to do the installation.
- Replace the Craftsman Universal fence, with a Shop Fox 14" bandsaw resaw fence. This will in theory bolt into the OE fence mount lug holes. It is a serious pity that Harbor Freight / Central Machinery dropped their bandsaw fence, they offered one that I wanted when the saw was new, but they were back ordered, and never came back in. The Shop Fox is similar but has the flip up resawing tall fence guide...
Miter Saw workstation / storage bench.
The miter saw station is structureally complete, however the following need to be finished to finish off the workstation.
- Finish building the drawers. This requires plywood. The slides are simple tab and slot. Basically the sides of the cabinet have basically dadoes of sort made of 3/4 ply, that are 3/4 high. The bottom of the drawer needs to be a bit thinner material, but basiclaly it is a simple slide in / out of the base of the drawer. Ultra cheap, but ultra easy design. Just need plywood to finish this up.
- Build some doors with european style hinges for the lower boxed tool storage compartments.
Tool Stacker replacement.
Due to my back issues, I REALLY want to stop using the tool stacker, and instead build 2 flip top tool stands. I need plywood, casters, flip up levellers, and steel rod / hammer on locking caps, ring bolts to fit star knobs. I am currently reviewing other peoples builds, and looking for design ideas on how to make these take up as little floor space as possible in the shop, and make flipping back and fort as easy as possible. These items all use 2.5" dust port. I want to integrate one of my 4x2.5" branch wyes next to where these will be stowed / used to allow for a short run of 2.5 direct into the 4" for dust collection.
- Stand #1 will house the Sunhill SM-150B benchtop jointer on one side, and the Ryobi AP1301 planer on the other side. It should be sized such that as little floor footprint can be used. Push blocks to be stored with table saw accessories in table saw extension table storage.
- Stand #2 will house the Dremel 16" scroll saw one one side, and Rigid EB4424 oscillating belt / spindle sander on the other. Onboard storage must be designed in to house the loose pieces for the sander including throat plates, spindles, spindle washers, sanding belts, sanding sleeves. As flipping the sander with these on board the sander would make them all spill out all over the place. Keep the footprint as small as practical.
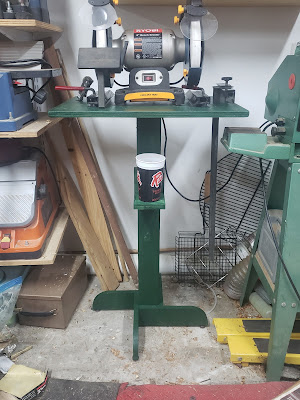
- I have already taken the Ryobi 8" bench ginder, and wolverine jig and fabbed up a sharpening station / grinder stand, which has already been put to some heavy use sharpening things like hatchets, and fingernail gouges... I know there is no small army of folks that will tell me I am wrong using a full speed grinder, but I am sticking with this due to my experience, and the recommendation of OneWay MFG.
Lathe storage and ballast:
My lathe tools need a place to live. This is where some recycling comes in. I am reviewing some other Jet JWL1236 lathe copy owners projects. A simple box that will hold 2 reclaimed cabinet drawers will house all of my turning tools, and accessories. This will be mounted up just above the spreaders on the base. Below the spreaders will be a basic plywood enclosure that will hold 80lbs of whatever ballast I can come up with cheap, and will be placed / mounted to doubled up 3/4 ply mobile base with heavy duty levellers. Since the garage workshop floor is sloped, levellers are critical. This is yet another item that is pending sheet goods. If you've seen the price of plywood lately you will know why I am not done yet.
Drill press:
Just like the lathe, drilling accessories and hand drills need storage. Especially since I have 2 corded 3/8" drills, and a 1/2" corded hammer drill, plus a couple of large sets of forstner bits, and about 6 or 7 drill bit sets, pocket hole jig, dowelling jig etc... I am wanting to make the following updates to the drill press and related storage.
- Replace the southern yellow pine spreaders on the HF mobile base, with 1.25" square steel tubing, keeping the current sizes.
- Replace the wooden base attached to the spreaders with a jointed and glued up 2x6 platform fitted to the opening at the base of the mobile base, screwed onto the mobile base, with the drill press mounted to this. This keeps the spreaders from bowing, and load transferred to the levellers.
- Build a rolling storage cabinet that would roll OVER the mobile base, AND straddle the drill press post. Side / back compartments to house the jigs. Side hooks to support the 3/8 drills in their blow molded cases, lower cabinet storage for forstner bit boxes, and drawers for drill bit, driver bit etc... sets. The intent here it to house all of my drills and drilling accessories on and around the drill press.
- Source up and attach dust port for the drill press. None of the commercial offerings I have seen are worth a hoot. At least mounting wise. I need to rig something. Looking for design ideas or recommendations for an out of the box dust collection solution.
- Clean up any / all indications of corrosion from the drill press, particularly the spindle, chuck, and column.
- Replace the belts.
Table saw extension table / router table. Adjust levellers. Remove simple under saw mobile base, replace with full width mobile base with levellers. Make sure work bench levelled up and shimmed to remain outfeed support for the table saw.
Climate / HVAC:
My Royal Sovereign 12K BUT portable AC does a fair job, especially considering it is an inefficient portable, but it REQUIRES that I use an auxiliary fan to move air through the shop to get good cooling. I wan tot make the following completions / updates to the HVAC to insure it is a comofortable / safe place to work.Finish insulating the space. The remaining outside wall on the north side of the building has yet to be insulated. I do not want to re-sheetrock the garage, so I am considering just hiring out and getting blown in insulation done, I can patch the holes used for the blow in no problem.
- Remove the portable unit. Replace the siding that has the ports for the hose ducting and finish the interior wall off.
- Obtain and install a 12K - 16K BTU ductless mini split AC with heat.
Lighting:
My current shop lighting is the old standard F40 T-12 electronic ballast shop light fixtures. 7 of them. Currently housing F32 T12 (32 watts instead of 40 each) bulbs. At least in 6 of them. 1, the one over the table saw has a bad ballast and is just consuming space at this point. I will be as soon as possible obtaining a box of 20, yeah 6 extra but that is the best price I could come up with, ballast bypass, double ended LED shop light tube bulbs. This means I simply wire hot to one ends pins, neautral to the other end, and keep ground where it is and chuck the ballast. Pretty easy, but money I don't have after Christmas, yay!
Summing it all up:
So yes, you see I still have a tremendous amount of work, and a bit of budget left to sink into the garage workshop. With any luck and no small part of blessing, I am hoping to wrap that all up in 2022, along with a good chunk of my remodelling projects in the house. At a minimum I know I need to finish up these...
- DC duct move / straightening. This is in progress.
- Install the band saw tires.
- Compressed air hard piping. I have all the stuff and have started installing the outlets.
- Lighting. This is for safety and energy efficiency. I need to buy the bulbs.
- Finish the miter saw cabinet drawers and doors.
- Blown in insulation. I may have to farm this out, but it shouldn't be too terribly expensive.
We will see what we can manage for the rest of it.