20 January, 2022

Upgrading the shop lights to LEDs, how I wired my double ended LED tubes.

So my old T12 2 tube shop light fixtures were starting to fail. Going through tubes quickly, and T12s are hard to come by these days, and the ballasts were buzzing loudly. I needed to either fix or replace these things...

Now Costco HAD some really nice I think they were either Feit or Honeywell 2 tube LED fixtures, but unlike the majority of the LED fixtures I have seen on the market, these seemed to be simply flourescent shop light casings and keystones, just no ballasts, and LED tubes instead, and I REALLY liked them.

While not a ton, shop light fixtures with their metal reflectors offer SOME, not much but some impact protection for the tubes, where the majority of the dedicated LED fixtures, the tubes themselves were structural members.

But my costco membership expired during the first month of COVID lockdown, and I didn't want to get anywhere near the insane people trying to haord toilet paper. And Sams club didn't have them.

So I started off going to Walmart, and tossed a box of T8 / T12 plug and play LEDs in the cart.  To say these were a miserable failure would be to complement them.  Searching the Walmart website and they no longer carry the ones I got. Good riddance!

I knew the problem would keep coming back if I kept the ballasts, I had to do a ballast bypass.

I started searching, and ended up on Amazon. FIrst landing on single ended, which means I had to replace the keystones as well and I did not want to do that. Mostly out of a desire to recycle as much of my original fixtures as I could. No need to toss more into the landfill, or the recylcers that really aren't recycling, especially since there are plastics involved.

So I started coming across double ended. No need for new non shunted keystones, I could recycle the keystones AND the wire from the fixtures.

The process is simple. Starting with an unplugged shop light fixture, preferrably on the bench take the fixture apart enough to expose the wiring and ballast.

Coming in from the power wire / socket, there are 3 wires, the ground runs straight out of the plug wire to a ring connector screwed to the fixtures. I left that alone.

Next is a long white wire that typically but not always ran to the far side of the fixture, it connected to and jumped between 2 keystones on one end. This is the neutral wire. I cut the other wires going to the keystones on this end as close to the ballast as possible. Strip the ends back about 3/8" ish... Cut the white wire at the same length, strip BOTH parts of the white wire and using an orange wire nut, wire nut these wires together.

The other wire coming in from the power cord will either be, or be converted to a black wire somewhere in there. Cut the black wire as close to the ballast as possible. Likewise cut the remaining keystone wires as close to the ballast as possible. Strip the wire ends and wire nut those together. 

Unscrew the screw securing the ballast, slide it out and fully remove it.

Insure all wiring connections are solidly made.

They should be as follows.

Green screw through ground wire ring termnal should have remained intact and untouched.

White neutral wire should be wire nutted to the 2 keystones that originally were connected to the white wire, and this should be a good connection secure in the wire nut, and secured in the fixture.

The black wire is your hot. This should be wire nutted / tied to the wires that feed the 2 keystones that are not tied together and were only connected to the ballast. Again the connection should be securely held in the sire nut, and if needed, secured in the fixture via electrical tape.

Additional security for the connections can be done by using a couple of quick wraps of electrical tape tightly around the connection and wire nut.

Now reassemble the fixture, and install the LED tubes. Mine had a big and small end. I like having the big end on the side with the power cord. Make sure the strip the LEDs actually mount to when the tube rotates in the pin socket, points TOWARD the reflector to keep the tube oriented the right way.

With both tubes ready, and some leather gloves on, plug the fixture into your extension cord, ready to pull the connection should it somehow be bad. The result you expect to see is both tubes lighting up. You may have to fiddle with tube position, or even try a different tube. 

Out of my box of 20, I had one tube that was defective enough that it would light, but only upside down. Not exactly useful.  Amazon gave me a credit for the tube so no harm no foul...

https://amzn.to/353RjzT

The brand was Hykolity, the cost was actually right around or maybe just a shave less than repalcement flourescent tubes, and certainly cheaper than buying new flourexcent tubes and ballasts.

Now the end result?

The Kill A Watt meter showed the fixture with 2 flourescent tubes / ballasts consuming 81w. WIth just the LED tubes, 36w, a more than 50% reduction in energy use. Being that my shop / garage is in Texas, the fact these LEDs run cool and thus don't add heat to my shop is a HUGE bonus, and....

WIth the new LEDs installed, it is SUBSTANTIALLY brighter in my shop. There are 2 main reasons for that though. One is the actual brightness of hte tubes, the other is the pattern of light output.

The light pattern for starters. The LEDs emit light in a pattern 200 degrees from their mount point. Or the strip that can be seen in the tube. Thus you are not shooting actual light directly at the reflector of the fixture. Like I said, my main purpose behind the reflector is to physically protect the tubes form impact. 

The flourescnet tube is just at ube of gas that glows when energized, sort of like Neon. It emits light 360 degrees, reflecting some of it, but losing effectiveness as it does so off the reflector. Maybe mirror polished diamond plate would work better but I wasn't going to go that fancy...

The other reason for the difference is the actual light output of the tubes. 
Not sure if I believe the numbers mind you, but I have seen product descriptions of the flourescent tubes I had been using for years, and they output something like 1550 lumens per tube, so 3100 lumens per fixture. That number is debateable, but since it is the one for the ad copy for the tubes I was running, I will go with that number.

The LEDs are rated at 2400 lumens per tube, so 4800 lumens per fixture. 

And I have a total of 7 fixtures in the shop. 
Flourescent 21,700 lumens.
LEDs 33,600 lumens.

To say the least visibility IN the shop is MUCH better than it ever thought of being.

I am NOT without shadows and certainly am going to need to add task lighting at some point, but for now, I think I have gone as far as I can with these fixtures.

If you have old T12 or T8 4foot shop light fixtures you'd like to upgrade to LEDs, and would like to help me out, please consider buying from my affiliate link. Thank you.

https://amzn.to/353RjzT

04 January, 2022

I finally finished my compressed air system! Detailed install and parts list.

My compressed air distribution system is done!

Okay I have written blog posts in the past regarding my compressed air system, including chasing down leaks, and other issues. It has taken over a decade, life happens you know, but I have finally finished my compressed air system to where I want it!

What was the goal I was trying to get to?

Simply put, I wanted a compressed air system that would allow me a reasonable buy in cost, with the ability to move an air compressor around in a portable fashion, while providing a LARGE amount of airflow, thus a dual compressor configuration, and outlets distributed through the shop, 1 at the back wall, 2 at the front, either side of the right side overhead door, and a self retractible overhead hose reel mounted in as unobtrusive a manner as possible. I wanted it RELIABLE, and LEAK FREE. And I wanted enough hose paying out from the hose reel into the driveway that I can work anywhere, on any car in the driveway without having to add a second hose. This meant moving the hose reel to the front of the shop.

Why did it take so long?

Honestly, Issues with the initial setup didn't become apparent until after years of use, nd I didn't know all the options. 

I had intended for years, including a VERY long time Amazon Wish list to have copper pipe, and fittings to build the system out. But copper pipe and its fittings were EXPENSIVE, and involved flame soldering to make the connections properly. Not very adjustable once installed, and, not particularly reusable if I decided to, or was forced to by SWMBO into moving the shop into a dedicated outbuilding / shed.

I was COMPLETELY unaware of the Polyurethane compressed air piping / push to connect fittings systems on the market. The only options I knew were avaialble were metal pipe, which is expensive, and hard to work with, or PVC pipe whcih is cheap, easy to work with, and could potentially be deadly when a pipe fails and throws shrapnel all over the shop. Neither of which were a good option.

I had heard about Rapidaire systems, which were less expensive than copper pipe, but still several hundred dollars worth of material. Even their "Master Kit" only included a few paltry fittings, although they included at least 3 outlet blocks, but the other costs of getting enough fittings, the original outlay cost of the kit, etc... added up to about twice what I was comfortable with paying.

So in the mean time, I had used Goodyear rubber hoses to make my runs, and honestly even that was a bit costly so I kept them short with custom made lengths to get the hoses I needed. The problem is the rubber air hoses develop leaks after a few years of use, and overall are not really reliable.

Now mind you, a good amount of what I used to complete my compressed air system was carried over from what was already in my shop, what I had salvaged from other projects that were tear downs including a former automotive garage I worked at decades ago, they were tearing out the shop to put in a convenience store. So I did NOT actually have to pay for a lot of this stuff other than sweat equity to reclaim materials that otherwise would have gone to waste.

And then Black Friday / Cyber monday happened, and the opportunity to get the kit, and few remaining pieces to complete the setup for WAY less money than just the cheaper kit would cost normally hit, and my wife wanted to know what I wanted for Christmas. I've never been so happy to want something cheaper than a pair of inexpensive dress pants for Christmas! 

So the components used were... I will link the least expensive versions of the items available online that I can find. Brands may differ from my actual used versions.

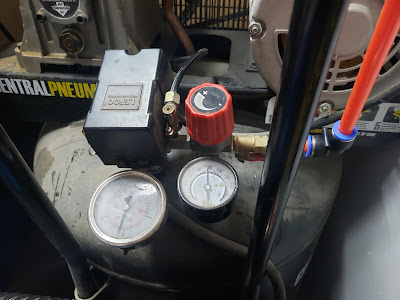
Central Pnuematic 29 gallon 2HP oil lubricated air compressor. https://www.harborfreight.com/29-gallon-2-hp-150-psi-cast-iron-vertical-air-compressor-61489.html I've had this about 10 years.

Central Pnuematic 8 gallon 2HP oil lubricated air compressor (discontinued, McGraw 10 gallon seems to have replaced it in the Harbor Freight Lineup) https://www.harborfreight.com/10-gallon-oil-lube-portable-air-compressor-58144.html I've had this maybe 12 to 14 years, don't recall...

Both compressors have had 1/4" street elbows, short lengths of brass pipe, and ball valves for tank dumping installed since 2014. This allows for dumping collected water from the tank and depressurizing without fishing around under the compressors...

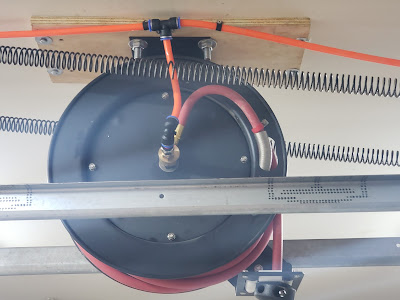
Central Pneumatic automatic hose reel with 50' rubber air hose. Hose replaced in December 2021 with new Goodyear hose. https://amzn.to/3EUjdKU This was originally set up in the back of the shop in maybe 2012? Not sure... 

Large assortment of Central Pnuematic Brass Industrial Quick Coupler Sets: https://www.harborfreight.com/brass-industrial-quick-coupler-set-4-pc-68241.html?_br_psugg_q=quick+coupler+set These have been acquired over the years, but the newest were bought in maybe 2014...

2 @ Control Devices P2525 one way ball check valve 1/4". https://amzn.to/3pSQbaf This was the manifold build in 2014

2 @ 1/4" FPT brass barstock tee,  https://amzn.to/3pT4Gen This was the manifold build in 2014

3/8 x 1/4 brass hex nipples / reducers. https://amzn.to/3EWCyem This was the manifold build in 2014, and I believe these came from the service station tear down job when we dismantled the garage before they built in the c store...

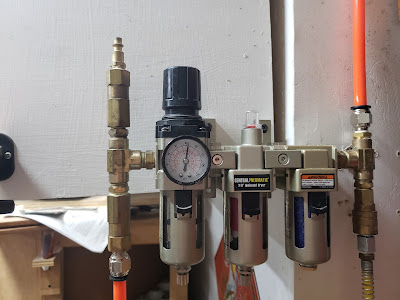
Central Pneumatic 3/8" regulator with filter. https://www.harborfreight.com/38-in-nptf-air-filter-with-regulator-58178.html This was the manifold build in 2014

Central Pnuematic 3/8 Dessicant Dryer with Oil Removal Filter. https://www.harborfreight.com/38-in-nptf-desiccant-dryer-and-filter-58180.html This was the manifold build in 2014

Central Pnuematic 3/8" Connector Bracket. Discontinued, no replacement. Use a 3/8" brass close nipple instead. This was the manifold build in 2014

1/4x1/4 brass hex nipples. https://amzn.to/3pViwwU These were from the service station teardown.

Bigatur Air Piping System 1/2”. https://amzn.to/3HvP8Dd

Beduan Push to Connect Fitting, 1/2" Tube OD x 1/4" NPT Thread 10 pack. https://amzn.to/3pT5Vu3

Since the Bigatur kit didn't include them, 2 @ outlet blocks used up front are Primefit 3/8 Push To Connect outlet blocks. https://amzn.to/3313v3h

1 pack 4pcs 1/4” ball valves. https://amzn.to/31m0w58 These were from adding the dump valves to the compressors, so 2014 time frame.

1 pack 10pc 3/8 to 1/4 NPT brass bushings. https://amzn.to/3JEo32A I needed to order a fresh bag of these. I was down to one...

1 pack 10 pcs 1/4" MPT brass hex pipe plugs. https://amzn.to/3EPMN4o Fresh bag. I had none.

10' custom made rubber air hose to connect 8 gallon compressor to keep it portable.


Now with the parts set up, let's explain the plumbing setup.


First off, I need to explain the "Manifold Assembly", it features largely to collect, regulate and clean, and distribute the air

My entry for June 6 2014 explains the setup of the manifolds, tees, valves etc... and is available here.https://www.daves-workshop.com/2014/06/clearing-air.html BUT let me summarize it for you.

Quick connect into one, and push to connect 1/4 thread coupler into the other check valves. 

Check valves into the first tee.

Tee into 1/4 x 3/8 nipple, and threaded into the inlet side of the regulator.

Regulator via 3/8 Coupler connected to the filter / dryer. Air coming out of this in theory will be clean, oil free and dry. Safe to use to spray finishes. 

Output side of filter dryer assembly out via 1/4 to 3/8 nipple into second tee. One side (Down) gets our first outlet, a Quick connect. Second side gets a 1/4 push to connect fitting.

Now the manifold assembly is done being described. Lett me back up to the air compressor(s) 

The 29 gallon compressor stays put, so the quick connect from its built in regulator is removed, after the regulated pressure is set to 100 psi. I never plan on exceeding 90psi, but want to fine tune at the manifold.

The Central Pnuematic 29 gallon air compressor with too much evidence that I haven't used my dust collector often enough! I need to fix that habit!

A 1/4" MPT  push to cnnect is screwed into the output of the compressor, and then a piece of the 1/2" PU tubing is sized up and connected. There first connection done.

The 8 gallon compressor has a factory fitted quick connect, a shop made / reclaimed section of rubber air hose with a male, and a female quick connect setup, connects from the compressor, to the secondary intake of the manifold.

The advantage of this is I have compressor output of just shy of 16cfm at 40psi, well beyond what I will need, and at a FAR lower cost, and space hit than a giant 60 or 80 gallon compressor!

Of course the "Manifold assembly is in there, all adjusted up and happy. psi at the compressor, 90 PSI at the regulator / filter. Not shown is the input from the 8 gallon compressor. It is sitting coiled up and only connected when needed.

The Manifold assembly. This took some time a long time ago to set up. Harbor Freight has discontinued these pieces in favor of a newer brand. By the time these die, they will likely be on to a different brand again.

Now on to the output. At the push to connect I sized up a piece to go between the coupler, and an elbow to make a tight turn at the ceiling. A couple of screws through some straps into the stud at the corner secure the tubing up the wall and we now make our way across the ceiling, THROUGH the purpose drilled hole in the shop light mount, and we periodically attach via straps and screws into the studs securing the air line on its journey across the ceiling. I did have a temporary location where the hose reel WAS, so in order to avoid wasting air tubing, I used a coupler from the kit to connect and extend the tubing.

The hose reel and its 3/4" plywood mounting board was moved from the back corner of the shop, forward about 10 feet or so to the space on the ceiling between the overhead door tracks. The tubing is split with a tee from the kit, and is secured as much as possible, INCLUDING using a length of Gorilla Tape to keep it from getting hung up with the overhead door hardware. There is NOT a lot of clearance here, and I do not want to cause problems. This is securely fastened using 1/4" lag bolts directly to the rafters.

The old Central Pnuematic hose reel with a new Goodyear hose. This has been a GREAT item in the shop. Makes easy work of taking out and putting up the hose! The fit is close, but gives me a couple of inches of room for the door to operate.

We ran another segment of tubing from the tee, to the front wall, where we meet an elbow, and another Tee via short section of tubing. This elbow goes down to the first outlet block. Will describe the assembly further below as they are both the same.

The line at the tee was extended to the outside wall, and turned with a final elbow from the kit. Occasional clamps and screws along the wal, and turned down to the outlet blocks.

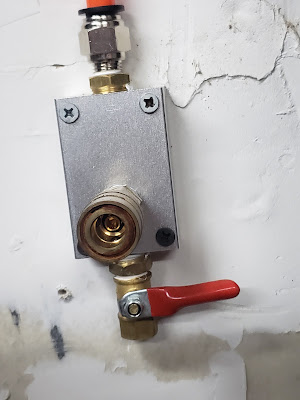
The outlet blocks have 4 holes in them. 1 1/4", and 3 3/8". The 1/4" is on what I consider the back side of them. I pipe sealed and installed a 1/4" pipe plug in there. The other three holes were filled with pipe taped 3/8 to 1/4 bushings. 

The top hole got the push to connect fittings (see why I bought extra?).

The front hole got 1/4" hex nipples, pipe taped, and then the quick connect couplers. You could save some time and MAYBE money by going with 3/8" MALE threaded quick couplers, but I had the female ones already. The steel quick connects that came with the kit also are female threaded with no nipples to install which I found quite odd.

The bottom hole got outfitted with the 1/4" ball / dump valves.

The dump valves should NOT have any moisture trapped as the air should be clean and dry before it gets there, BUT it does help depressurize the system if the valve at the compressor is turned off. 

The outlet block assembled and in use. That ball valve can easily and quickly dump pressure from the lines if needed. NO the drywall behind it isn't finished right. Nor do I care... It is a garage after all.

I have finished the connections and pressured up the system, compressor to 100psi, and manifold regulator to 90psi yesterday, there has been no drop whatsoever on either gauge in the last 24 hours.

I do need to add a couple more of the straps from the kit, with some drywall screws to retain the tubing to the ceiling / wall where it sags a touch, but it isn't any additional outlay of money, just some time, and it can happen after the rest of the shop gets finally cleaned up. 

But in the mean time, I have a spot, more or less anywhere I am working in the garage to plug in an air hose, and I have WAY more than enough air hose to run it out to anywhere around any car in the driveway.


What's next?

Well, since I am still knocking my brains out trying to clean, and reorganize my shop, so that I can finish building stuff for finishing the home remodel, and I have (almost) all the parts, I will finish the re-routing of the 4" dust collection main. I have the wall brackets, and fittings I need to make it happen, and I want the run straighter, blast gates easier to get to, and a LOT less flex hose in the mix of things.


The other Christmas present I got was a set of Polyurethane bandsaw tires for the Central Machinery bandsaw. I will be upgrading those AFTER the shop cleanup is done.

29 December, 2021

Pending, or in progress worshop upgrades. New years resolutions?

Like most likely many of you, my workshop is a disaster area. too many doo dads ending up all over the place with no real place to store them, so every horizontal surface got covered.

In order to help get, and keep things organized, clean, safe, and efficient, I am in progress on, or am in the planning phase for the following shop ugrade projects.


Dust collection.

I am unsure of where I am with what I have said on my blog about the current configuration. So here goes.

I have a Central Machinery 2HP 70 gallon dust collector. The older green model, not the current gray one. Updates to this dust collector in order to get it up to par, and as compliant as possible with the advice of Bill Pentz, the guy that poured years of engineering expertise into dust collection, I made the following upgrades.
  1. Wynn 35A .5 micron pleated cartridge filter.
  2. Wen 3403-22 "Turbofan" A.K.A. replacement impeller. The OEM impeller was 9.5", the new Wen impeller BARELY fits in the impeller housing, and is a full 12" diameter.
  3. Neutral Vane. I used the pattern from LCHIEN at Sawdustzone.org. I simply had the pdf file printed out full size at Office Depot since it was bigger than my printer could do... Unlike lchien however, my neutral vane is secured via a short rivet, his floats. https://www.sawdustzone.org/forum/discussions/shop-setup-layout-and-design/36139-hf-neutral-vane-pictures-reposting
  4. Removed the Thien 55 gallon external drum separator. Mind you, the separator works amazing, but it took a huge bit out of airflow performance to the system downstream. It was still more than enough to keep dust in suspension, but I wanted more airflow, more vacuum. IF separation is insufficient using the neutral vane, I will make and install a Thien baffle, IN the seprator ring in the dust collector. Simply put, I have zero interest in a secondary stage at this point, due to the risks from potentially sucking up sparks into a dust bin, and not seeing smolders, AND the reduction in airflow. You never know when you will hit a hidden nail you failed to catch with a metal detector right?

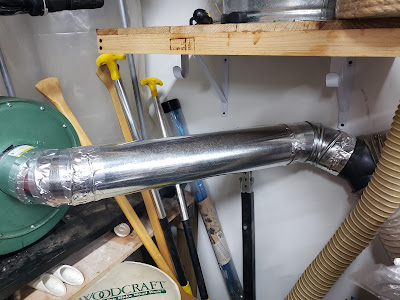
Once the external separator was removed, I removed the 5" flex hose. in favor of 5" HVAC elbows set to 45 degrees, and a segment of smooth 5" metal HVAC pipe, this is run to the 5x4x4 splitter that was OEM from the HF DC, and there are 2 4" mains, one at the floor, one across the ceiling.  The 4" mains are a mix of DWV PVC pipe and fittings, with a few dedicated ABS dust collection fittings, and aluminum blast gates. To accomplish my reconfiguration goals, and to remove the bits of ribbed flex hose to make the connections, I need 4 more slip x slip 4 inch 45 degree elbows. Need a trip to Home Depot as I can buy all 4 I need for less than I can order 1 online...


The connections to the 5x4x4 are currently made with 4" flex hose. I am planning on making my connections to the mains using 45 degree elbows in order to make smoother transitions, and move the floor run up mid wall.  I am pending delivery of 4" U clamps. So far even with the ducting as it is, air flow and suction and flat out awesome considering that it is a Central Machinery 2HP Dust collector.

LONG TERM. I am reviewing data from several users that have done the math, and shown the speed drops at various distances, and am on the fence between going with 5" single main, OR a 6" single main. My entire run is around 20' and it is pretty straight... Either way I go, I am planning on using HVAC ducting / fittings as dust collection spiral stuff is astronomically priced.


Compressed air:

After all these years, my cotton reinforced rubber hoses are cracked and leaking. I replaced the hose in the hose reel, but I need to pipe the workshop. 

I am using a Rapidaire knockoff system that I got for Christmas. I will keep the one quick connect port at the outlet of the manifold for use at the back of the shop,  The quick connect on the hose that currently feeds the output to the hose reel will be reclaimed as I will hard pipe it in, as well as the input from the 29 gallon compressor. I will leave the 8 gallon more easily disconnectable in order to facilitate taking it around the property, or to a remote site for work as needed.

I have removed the ladders and jettisonned them to the back yard, and will be moving the overhead hose reel to between the overhead doors. 

Coming out of the compressed air manifold, I will be going across the shop roof to a T fitting, with the leg shooting over to the hose reel where I will make a solid connection there, no quick connect. 

At the front wall, I will be connecting an outlet block with a quick connect, and a dump valve between the overhead doors, and at the overhead door on the wall sort of next to the lathe. 

This configuration will give me EASY hose accessibility to my pnuematic tools anywhere I need in the shop, along with an additional at least 14 feet of available hose from the hose reel out to the very end of the drivewall, all around the cars.


The bandsaw:

I have made the following modifications to my Central Machinery 1HP 14" 4 speed woodcutting bandsaw.
  1. Central Machinery mobile base.
  2. Central Machinery riser block kit for a total of 12" of resaw.
  3. MLCS paddle safety on / off switch.
  4. Grizzly G0555 tension release mechanism.
  5. Carter Cobra Coil
  6. Accura ball bearing blade guides. I originally go the Micro Adjustable set to fit the Delta, the upper guide post mount does NOT fit the post for the Central Machinery. I could get a nice bushing made, but instead the yoke turned out to be a perfect fit, so I took the yoke out of the CM upper guide, and swapped in the Accura yoke. So no micro adjust, BUT I have the bearing guides and it works awesome.
  7. Carter wheel brush.
  8. Jet lower blade guide dust port. The CM OE port was sized for like a 1.75" hose, whatever the tiny shop vac hose is, and it would NOT fit my 2.5" hose. I got the Jet unit that fits the 2.5 hose and mounts using the OEM holes. MUCH better pickup.
  9. Lower wheel guard 2.5 inch dust port that collects dust immediately under the wheel brush.
  10. Craftsman universal bandsaw fence. I HATE this fence, but it IS better than nothing.
Pending upgrades to this band saw to get it 100% where I want it.
  1. Replace deteriorating OE tires with polyurethane tires. Recieved them for Christmas, just need to do the installation.
  2. Replace the Craftsman Universal fence, with a Shop Fox 14" bandsaw resaw fence. This will in theory bolt into the OE fence mount lug holes. It is a serious pity that Harbor Freight / Central Machinery dropped their bandsaw fence, they offered one that I wanted when the saw was new, but they were back ordered, and never came back in. The Shop Fox is similar but has the flip up resawing tall fence guide...

Miter Saw workstation / storage bench.

The miter saw station is structureally complete, however the following need to be finished to finish off the workstation.
  1. Finish building the drawers. This requires plywood. The slides are simple tab and slot. Basically the sides of the cabinet have basically dadoes of sort made of 3/4 ply, that are 3/4 high. The bottom of the drawer needs to be a bit thinner material, but basiclaly it is a simple slide in / out of the base of the drawer. Ultra cheap, but ultra easy design. Just need plywood to finish this up.
  2. Build some doors with european style hinges for the lower boxed tool storage compartments.

Tool Stacker replacement.

Due to my back issues, I REALLY want to stop using the tool stacker, and instead build 2 flip top tool stands. I need plywood, casters, flip up levellers, and steel rod / hammer on locking caps, ring bolts to fit star knobs. I am currently reviewing other peoples builds, and looking for design ideas on how to make these take up as little floor space as possible in the shop, and make flipping back and fort as easy as possible.  These items all use 2.5" dust port. I want to integrate one of my 4x2.5" branch wyes next to where these will be stowed / used to allow for a short run of 2.5 direct into the 4" for dust collection.
  1. Stand #1 will house the Sunhill SM-150B benchtop jointer on one side, and the Ryobi AP1301 planer on the other side. It should be sized such that as little floor footprint can be used. Push blocks to be stored with table saw accessories in table saw extension table storage. 
  2. Stand #2 will house the Dremel 16" scroll saw one one side, and Rigid EB4424 oscillating belt / spindle sander on the other. Onboard storage must be designed in to house the loose pieces for the sander including throat plates, spindles, spindle washers, sanding belts, sanding sleeves. As flipping the sander with these on board the sander would make them all spill out all over the place. Keep the footprint as small as practical.
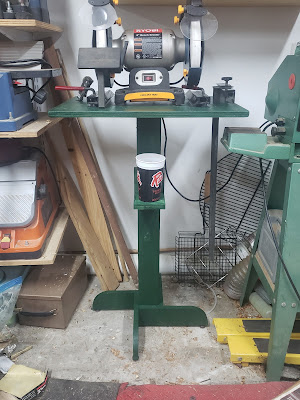
  3. I have already taken the Ryobi 8" bench ginder, and wolverine jig and fabbed up a sharpening station / grinder stand, which has already been put to some heavy use sharpening things like hatchets, and fingernail gouges... I know there is no small army of folks that will tell me I am wrong using a full speed grinder, but I am sticking with this due to my experience, and the recommendation of OneWay MFG.


Lathe storage and ballast:

My lathe tools need a place to live. This is where some recycling comes in. I am reviewing some other Jet JWL1236 lathe copy owners projects. A simple box that will hold 2 reclaimed cabinet drawers will house all of my turning tools, and accessories. This will be mounted up just above the spreaders on the base. Below the spreaders will be a basic plywood enclosure that will hold 80lbs of whatever ballast I can come up with cheap, and will be placed / mounted to doubled up 3/4 ply mobile base with heavy duty levellers. Since the garage workshop floor is sloped, levellers are critical.  This is yet another item that is pending sheet goods. If you've seen the price of plywood lately you will know why I am not done yet.


Drill press:

Just like the lathe, drilling accessories and hand drills need storage. Especially since I have 2 corded 3/8" drills, and a 1/2" corded hammer drill, plus a couple of large sets of forstner bits, and about 6 or 7 drill bit sets, pocket hole jig, dowelling jig etc... I am wanting to make the following updates to the drill press and related storage.
  1. Replace the southern yellow pine spreaders on the HF mobile base, with 1.25" square steel tubing, keeping the current sizes.
  2. Replace the wooden base attached to the spreaders with a jointed and glued up 2x6 platform fitted to the opening at the base of the mobile base, screwed onto the mobile base, with the drill press mounted to this. This keeps the spreaders from bowing, and load transferred to the levellers.
  3. Build a rolling storage cabinet that would roll OVER the mobile base, AND straddle the drill press post. Side / back compartments to house the jigs. Side hooks to support the 3/8 drills in their blow molded cases, lower cabinet storage for forstner bit boxes, and drawers for drill bit, driver bit etc... sets. The intent here it to house all of my drills and drilling accessories on and around the drill press.
  4. Source up and attach dust port for the drill press. None of the commercial offerings I have seen are worth a hoot. At least mounting wise. I need to rig something. Looking for design ideas or recommendations for an out of the box dust collection solution.
  5. Clean up any / all indications of corrosion from the drill press, particularly the spindle, chuck, and column.
  6. Replace the belts.
Table saw extension table / router table. Adjust levellers. Remove simple under saw mobile base, replace with full width mobile base with levellers. Make sure work bench levelled up and shimmed to remain outfeed support for the table saw.


Climate / HVAC:

My Royal Sovereign 12K BUT portable AC does a fair job, especially considering it is an inefficient portable, but it REQUIRES that I use an auxiliary fan to move air through the shop to get good cooling. I wan tot make the following completions / updates to the HVAC to insure it is a comofortable / safe place to work.Finish insulating the space. The remaining outside wall on the north side of the building has yet to be insulated. I do not want to re-sheetrock the garage, so I am considering just hiring out and getting blown in insulation done, I can patch the holes used for the blow in no problem.
  1. Remove the portable unit. Replace the siding that has the ports for the hose ducting and finish the interior wall off.
  2. Obtain and install a 12K - 16K BTU ductless mini split AC with heat.

Lighting:

My current shop lighting is the old standard F40 T-12 electronic ballast shop light fixtures. 7 of them. Currently housing F32 T12 (32 watts instead of 40 each) bulbs. At least in 6 of them. 1, the one over the table saw has a bad ballast and is just consuming space at this point.  I will be as soon as possible obtaining a box of 20, yeah 6 extra but that is the best price I could come up with, ballast bypass, double ended LED shop light tube bulbs. This means I simply wire hot to one ends pins, neautral to the other end, and keep ground where it is and chuck the ballast. Pretty easy, but money I don't have after Christmas, yay!


Summing it all up:

So yes, you see I still have a tremendous amount of work, and a bit of budget left to sink into the garage workshop. With any luck and no small part of blessing, I am hoping to wrap that all up in 2022, along with a good chunk of my remodelling projects in the house. At a minimum I know I need to finish up these...
  1. DC duct move / straightening. This is in progress.
  2. Install the band saw tires.
  3. Compressed air hard piping. I have all the stuff and have started installing the outlets.
  4. Lighting. This is for safety and energy efficiency. I need to buy the bulbs.
  5. Finish the miter saw cabinet drawers and doors.
  6. Blown in insulation. I may have to farm this out, but it shouldn't be too terribly expensive.

We will see what we can manage for the rest of it. 

28 December, 2021

Workshop updates that were rejected. What they were, why I considered, then rejected them.

If you watch my workshop page, you will know I have been cleaning up my workshop, and making the last of the updates to a couple of the major tools. Most notably the final mods wanted for the Central Machinery 14" band saw, and the Central Machinery 2HP dust collector. 

Now I am not flush with cash, but there are some items I was considering saving up / selling off some stuff to be able to afford, but these updates were considered, and rejected. So here is what I was mulling over, why I thought it would be a good idea, and why I am rejecting the idea...

#1. Selling off my Northern Industrial 13" 16 speed drill press and replacing it with a Wen 12" variable speed bench top drill press. Plain and simple, when I found the Northern Industrial on Craigslist more than a decade ago, the Ryobi DP121L was on clearance, I wanted one then, but the $179.00 clearance price was steep for my budget at the time when a used and needing some TLC floor model Northern Industrial could be had for $75.00. But I wanted a bench top model due to space concerns. I wanted to store my drill bits, jigs and hand drills in a cabinet underneath the drill press.

After LOTS of searching for something that will work, I have decided to build a rolling storage cabinet that will straddle the mobile base of the floor drill press, AND have a notch / straddle the post. This way I have the under drill press storage I wanted so desprately, while mantaining the full length column. Now all I need to do is build it...

#2. Selling off my Chicago Electric 12" sliding compound miter saw and buying a compact Metabo HPT 12" double bevel slider. I wanted a more compact slide with better dust collection, and double bevels.

The Chicago Electric flat out is smack on accurate, with repeatable clean cuts at any angle. I wouldn't actually use the double bevel feature out of fear of lopping fingers off, and my bench is sized specifically for this saw, and my shop. I gain no space advantage with a smaller footprint saw, and actually get some serious disadvantage with the clearnace to the freezer.

#3. Selling off my Sunhill SM-150B 6-1/8" benchtop jointer, and replacing it with a Wahuda 10" spiral cutterhead bench top jointer. This would give me a spiral cutter head, which is great, AND an extra nearly 4" of face jointing. On RARE occasion I need to face joint material wider than 6-1/8".

The Sunhill does everything I want it to. Wider stock can be run through my planer on a jointing sled, which takes next to no shop space, so no real advantage to the width, and as long as I run clean, metal free boards through it, the knives last a good long time.  Plus the $750.00 some odd dollar price tag is a bit of sticker shock for a bench top unit... Not to mention the 10" jointer bed does consume quite a bit more of floor real estate compared to the 6-1/8".

#4. Selling off the Ryobi AP1301 13" benchtop jointer and splurging on a Dewalt DW735x. This would give me a cutter head lock, plus the dust blower to assist the dust collector. All in all an excellent machine.

The Ryobi was a Valentines Day gift from my lovely bride years ago, my concern over the lack of cutter head lock was due to snipe, but the more experience I get with it, the more boards come out of it with no, or next to no discernable snipe. Meanwhile I am seeing LOTS of people having sniping problems with cutterhead equippped planers, even the vaunted DW735x. Now in no small part there is the attachment value as this was a gift from my wife, so even if there was a noticeable difference in performance, I might just stay put anyway. 

#5. Selling off, or repurposing my Ryobi 8" full speed bench grinder, and replacing it with a Wen, or Rikon variable speed 8" bench grinder. LOTS of folks on the turning forums swear by low speed grinders for sharpening. They made me self conscious about sharpening my turning tools with a full speed grinder.

First off, I own the Ryobi. It has the cool grinding white oxide wheels, and the sharpening jig MFG OneWay that built my Wolverine sharpening jig setup, recommends a full speed 8" grinder. I learned on a full speed grinder, and can get wicked sharp grinds using a full speed grinder. I need to learn what advice on forums is good, and what is just, going with the crowd... I figure OneWay with their expertise in the field, knows what they are talking about. And my practice, this thing has worked fantastically.

#6. Selling off my Ryobi BT3100 table saw, and all its accessories, and buying a SawStop 3HP Professional Cabinet saw with the 52" fence, router table wing etc... HUGE safety improvement, huge performance improvement, etc...

This has NOT been completely rejected, and I would absolutely NOT turn down a sponsorship from SawStop, or a donation of said saw, but the price tag is just way out of reach for me at over $4,000.00 for the whole setup. Here is hoping down the road sometime... Honestly as long as the saw stays reliable, and I have enough spares to make that happen, and assuming there is an aftermarket swap in blade brake that comes to common market that fits and works, no real need.

All in all, I am happy with my shop equipment, although not 100% thrilled about my shop layout / configuration. But I suspect I am well on my way to getting there...

Next up... Pending and in progress shop upgrades / updates.

22 November, 2021

Central Machinery (Harbor Freight) 2 HP dust collector upgrades.

 I talked about it in my last blog post, but I wanted to dedicate a post to this subject as I figure it will be easier to find that way.

My now old, circa 2009 Central Machinery 2HP dust collector that I bought from Harbor Freight on sale and with a 20% off coupon, has always worked okay, but I want more than okay. I wanted it to work well, if not great, and there are some simple modifications that go a long way to making this a much better unit.

The modifications to the dust collector are....

  • Replace the 20 micron bag filter with a .5 micron cartridge filter. This actually filters the dangerous dust, AND provides superior airflow. I went with a Wynn Environmental 35a spun bond poly long ago, but there are newer less expensive options nowadays. 
  • Replace the tiny stock impeller with an impeller that is basically the biggest impeller I can fit in the housing. There are 2 that I know of, one from Rikon that has been next to impossible to get, and when available costs almost as much as the dust collector, and one from Wen, the 3403-22 Turbofan. I went with the Wen. All of the online tests of this modification alone show increased CFM of at least 35%, and static pressure (vacuum) increases of at least 10%. There is an increased startup amp draw, but it is not huge. 
  • Upsize the inlet flange from 5" to 6". For now I will use a 6x4x4 splitter, but long term idea is to rip out the dual 4" system, and run a single 6" main, and reduce to 4" or 2.5" as close to the tool as possible. 
  • Set up a cyclonic separator of some sort. I am looking to save space, so instead of staying with my 55 gallon Thien separator, I am going to go with a Thein baffle in the separator ring of the dust collector.

To do these modifications I will need / have the following materials.

  • .5 micron Wynn 35a spun bond poly (washable) cartridge filter. This model is no longer available, and Wynn has gotten expensive recently. In lieu of the Wynn filter, the Donaldson P181038 filter is reported to be a direct equivalent to the Wynn 35a with a much lower price tag. https://amzn.to/3DMrJfs  You may want to use Wynn's floating gear latches to secure the filter, or possibly come up with your own rig. https://wynnenv.com/products-page/woodworking-filter-pricing/fgl-l-4/
  • As far as I know, the current Central Machinery 2 HP dust collector is more or less the same as the old one, but with a different base, and paint color. https://www.harborfreight.com/2-hp-industrial-5-micron-dust-collector-97869.html?_br_psugg_q=dust+collector
  • The Wen impeller in November 2021 ran me $35.00 delivered. https://wenproducts.com/products/340...530916dc&_ss=r
  • I am using a Hydrofarm AC6F 6" flange that will need to be drilled to match the Harbor Freight mounting holes. This will upgrade the inlet flange to 6" allowing connection of course to a 6" ducting system. https://amzn.to/3nFicRJ

Unlike most Harbor Freight dust collector upgrades, I am not going to use a separate cyclone or seprator, but instead use a Thien cyclone separator in the separtor ring of the cust collector. There is a good but now old write up on Phil Thiens forum regarding this specific modification. The standoffs the original poster used are a bit on the big side, but the idea is right there. http://www.jpthien.com/smf/index.php?topic=145.0

The process? Starting with the impeller and flange upgrade.

  • Unplug the dust collector, or at the very least, removing the safety key from the switch. We do NOT want the impeller to start moving while our hands are in there!
  • Remove the inlet hose from the flange.
  • Remove the attachment screws for the flange. I placed mine in a magnetic bowl while working to keep them from wandering off. The gasket may stick to the flange, or the impeller housing. Keep it on either for now. IF it stays on the impeller housing, just leave it there.
  • Using a 5mm allen wrench, loosen and remove the retaining screw turning clockwise. This is a counter threaded screw so righty loosey here! Keep the trust washer with the screw in the orientation it came off.
  • Using a 3 jaw puller, CAREFULLY attach the puller to the flange lip of the stock impeller. And run the puller pressure screw in, making adjustments to your puller to be sure you get a succesful pull all the way until the impeller comes off. 
  • Rotate the motor shaft such that the keyway, and retaining key are pointed directly up.
  • Coat the inside of the bore and keyway of the new impeller with a light oil. I used air tool oil as it was right where I was working.
  • Align the new impeller bore / keyway to the key / shaft, and wiggle it a bit until it just barely starts to go in. You are going to need to drive it home though.
  • Using a rubber mallet, and a piece of scrap wood as a striking surface, drive the new impeller onto the shaft, striking the wood, and using the wood to push the impeller hub, until the impeller is fully seated.
  • Rotate the impeller several times insuring no operational interference..
  • Match original flange to new flange back to back. Using silver sharpie or similar, transfer screw hole locations.
  • Using center punch, and supported on an anvil of some sort like a machinists vice, dimple each screw hole location in the new flange, This will keep your drill bit from walking off.
  • Size up, and select the proper drill bit for drilling metal. Using proper PPE drill the holes. 
  • Transfer the gasket if it is on the old flange, if not move to installing new flange on the impeller housing.
  • Replace safety key and / or plug dust collector back in. Turn it on and verify function.
  • Attach new ducting, or adapter to make it work with existing ducting. 
So the impeller is now upgraded, and the flange upsized. 

Moving on to the cartridge filter. 
  • Remove the original bag filter, and support bar. These can go away now.
  • IF your filter does not have gasket material on the bottom, obtain some foam weatherstrip material and attach it. You NEED a gasket there!
  • Install filter per MFG instructions, or at the very least, using bungee cords, strap that sucker down. I linked the Wynn clips. My old 35A uses tiny turnbuckles on the inside to hold it in place.
So now the cartridge filter is installed.

For the Thien baffle, see the link above. Vaughn said it better than I can, not to mention his DC is Plum crazy purple with a giant Hoover sticker on it... 

Other mods that would be worth it?

Side flip conversion that rotates the impeller housing, and eliminates the hose between the impeller housing at the separator ring. 

With a side flip, making a shorter Thien trash can separator.

However, with my intended function, of eventually fitting into a much smaller workspace, and the need to keep the DC small, I felt this setup was as optimal as I was potentially going to get.

20 November, 2021

Overdue shop cleanup, and updates.

My shop is well overdue for some serious cleanup. My wife had decided the shop is a dumping ground for everything, and honestly I let it grow from there. This is after all my space, I could have simply jettisoned the unwelcome intrusions to my space, but I didn't.

So I have spent time over the last week sorting, cleaning, and fixing. 

I am again finding tools I thought I had lost. I once again have a full set of Snap On deep well 3/8" drive metric sockets, and a full set of Snap On metric combination wrenches. In both sets the 15mm were missing, in both sets somehow they were behind the lathe. Not sure I want to know.

I sorted my small parts bins, and found I have WAY too many and WAY too varied fasteners. But at least they are sorted now.

My overhead hose reel, which I will have go to back in this blog itself to see how long ago I installed it, but probably at least 8, but maybe as much as 10 years ago. Well the hose started leaking. So I grabbed a new Goodyear hose and replaced the old one...

I finally got fed up with the leaks in my existing air hose jumpers such as from the compressor to the manifold just prior to the regulator, dryer, filter, oil separator assembly. And it was being caused by the weight of way too much extra hose being left on the quick connect joints.

So to alleviate this, I picked up a pneumatic ferrule crimp tool, and a box of ferrules, and went after making my hoses cut to length for this application. Sadly this turned out to be problematic as the first box of Ferrules I bought, advertised for 3/8" air hose do not actually fit 3/8" air hose, at least not 3/8" rubber air hose that has a measured O.D. of .62, so instead I returned the box of .5something ferrules and ordered the right size, which should be at my door tomorrow. Hope I don't need compressed air before then.

As you know from my Workshop page I own a Harbor Freight 2HP dust collector that is fitted with a .5 micron Wynn Environmental washable filter, which in over 10 years has never needed to be washed due to my Thien cyclone. 

Well the suction / CFM of this thing has always lacked a bit. I always knew the factory impeller was garbage and massively undersized, but the only alternative I knew of, the Rikon impeller was expensive, and constantly unavailable. 

I found recently that the Wen impeller for their bag dust collector is a great match for the HF DC, and is reasonably priced. So I grabbed one, and I must say, I am impressed with the apparent build quality, not to mention the fit, and overall size of this thing. The change in airflow / suction is quite noticeable. Sorry I have no way of measuing it, but there are folks that have done this swap and measured it. I must say though, if you already have a Harbor Freight 2HP dust collector, GET THIS IMPELLER AND DO THE SWAP! It will behave like a totally different machine! 

I am finding a LOT of contradictory information out there, I know the OE impeller equipped HF DC just won't support 6" duct, but some folks say impeller swapped will, and some say it won't. I am leaning toward will, so my thought process is this...

In the upcoming months pull the 2 4" runs, convert to a single overhead 6" with a single 4" branch to provide under cabinet for table saw, and router. The rest will have branch Y fittings and drop to 4
 as close to the tool as possible.

Another mod that is coming is I am removing the 55 gallon drum Thien separator from the system, and instead using a Thien sparator in the separator ring in the dust collector, these reportedly work just as well, and should be much more space efficient, although I will have to empty a bag instead of a drum, no big deal...

So back to the cleanup I guess.. Thanks for reading.

09 June, 2021

Reply to 9 Hacks to Avoid Camp Kitchen Setup Disasters.

 My wife sent me an article posted on Outsideonline.com with a date of June 6 2021. 9 Hacks to Avoid Camp Kitchen Setup Disasters. https://www.outsideonline.com/2423927/camp-cooking-fails-hacks 


I thoroughly enjoyed reading the article with a chuckle.  Most of it is good advice from a very specific perspective. 


The writer, Joe Jackson interviews Lars Alvarez-Ross co owner of Bio Bio Expeditions with 35 years guide and camp cook experience. And while I admit I have not been a professional camper / guide for nearly that time, I have been camping for over 40 years, including living in a VW Bus for about a year which was effectively long term camping, working as a river guide in Oregon in my late teens, and working in the restaurant industry with an in depth knowledge of proper kitchen procedure and sanitation.


While Joe's article is well written, and Lars’ suggestions are good and can be beneficial, I find additional information will be very helpful. Instead of addressing each item in the list, I wanted to go over Camp Kitchen setup, and procedures to ensure everyone is well fed, and has an enjoyable trip!


The first few problems Lars talks about in the article revolve around proper packaging of food, and preparation and usage of a cooler. And while there is a lot of science behind what seems such a simple thing like a cooler, let’s look at what we are trying to accomplish. 


Heat, being energy, wants to move from a space with a lot of that energy (hot) into and fill a space with less of that energy (cold). And by using the cooler we are trying to interrupt that process. We do this by having the coolers built with insulating material that slows the process down, pre-cooling the materials and contents as much as we can, and keeping it as well out of heats way as possible while in use. We also place items in the cooler that act as places for heat to go instead of our food. I.E. ice.  As heat goes into the ice, this causes water (ice) to transition from solid to liquid states.


It is the liquid state of our heat sink as it were, that we start to see a problem. The liquid, water, tents to intrude on our contents we are trying to protect. Meat, cheese, butter, lettuce etc… and mix the contents therein together, along with water, contaminating the whole lot.


Lars solution of multiple coolers is only partially effective. We need a complete solution. And short of electrical refrigeration, we need to address the issue using ice. 


For starters, we are going to keep our infrequently accessed items, such as food for meals in one cooler, and frequently accessed items such as drinks, and snacks in a separate cooler. All items need to be stored in properly sized, watertight plastic containers. Zipper bags are contrary to their advertising campaigns and marketing materials, NOT truly waterproof / leakproof. Years of sad experience show me that the claims are false. I use Rubbermaid food storage containers and am happy with the results. 


Now the food is packed, we need the heat sink / ice. Cubed, bagged ice will melt faster than larger solid pieces of ice, and in a bag will leak water all over the inside of your cooler. FAR less than ideal. Now Lars recommends ⅓ cooler capacity to be taken up by ice. I am telling you in my experience, with pre-freezing foods like ground beef, chicken etc.. that can be frozen and then packaged, you should account for at least ¼ of your cooler capacity for ice. If you can get more in, fine. Now my recommendation is to collect SQUARE quart size water bottles, fill them most of the way, squeeze out any remaining air so that the sides are sucked in and then freeze them. So say you have a 55 quart cooler, you want 14 of these quarts for these ice blocks.Load your cooler mixing food containers, with ice blocks close in and fill any remaining open space in the cooler with regular 16 oz frozen water bottles. The idea again is the get as much heat sink in there, and as little space for hot air to exist in the cooler.


Your drink cooler will not last cold as long as your food cooler, and that is okay. This is where you will use bagged ice. 


Both coolers should be brought into an air conditioned space several days prior to the trip to cool off completely. 24 hours prior, fill them entirely with ice. And at load up / in time, discard the ice from both coolers, load the pre-cooled food and drinks into the appropriate cooler, as well as the ice blocks in the food cooler. Grab a fresh bag of ice on the way out for the beverage cooler.


Another issue talked about in the article was forgetting important cooking items, of note were cooking oil and butter. Lars' recommendation was to have a dedicated camping bottle of cooking oil. Unless you camp weekly, this seems to me to be a sure fire way to eventually end up with Rancid cooking oil. Instead of that, just make a checklist of everything you are going to need for the trip, including a full grocery checklist. If you check off items as they are packed and loaded up, you aren’t forgetting them are you?


Other problems mentioned included cutting board hygiene, and improper washing / sanitation of dishes and cookware. Common sense would tell you don’t chop veggies on a cutting board that you just cut chicken on without washing. Change your prep order to chop the veggies first, wipe clean with a bleach wipe and then a quick rinse, THEN cut up / prep the meat. And do we REALLY need to talk about the need to make sure you are washing your dishes and making sure food bits get off of the forks and spoons after eating? I mean seriously, if you think you can lick your fork clean you are probably too young to be handling a camp kitchen safely. Use biodegradable soaps to avoid fouling the environment, especially if you have no means of gray water collection, collect and burn or any food waste you can. Any you can’t pack it out.


Another problem mentioned in the article is something I guess folks run into and don’t prep for. I don’t know if I have ever experienced a stove blow out but I can see how it can happen. I tend to set up my camp kitchen to not allow this…. Mostly because I end up in windy conditions being more concerned about contaminants being blown into my food, than the stove going out.


Are you using an EZ Up for a kitchen cover? Get shade wall accessories to protect from sun, rain, and more importantly wind. I set up using 2 Sun Walls with pockets. A third wall is me pitching my main tent close to the kitchen tent as a wind blocker, and the privy tent on the remaining wall covering 7 of the 10 feet, allowing a nice 3 foot easy walkway into the dining hall as it were. Using a screen room? Attach silver tarps to the sides to act as sun walls that will block the wind. Wind in the kitchen strong enough to douse a stove, is also strong enough to blow all sorts of dirt, and contaminants into your food.  Are you using a tarp rig? Set up your pitch differently to act not just as a sun shade / rain block, but to block with wind as well. 


Even when I was VERY young, and VERY poorly equipped, we would set up with a spare sheet from home tied to sticks jammed into the ground to make a wind block at a picnic table to keep the wind off of my old single burner bottle top stove… 


With proper kitchen setup, even the cheapest camp stoves can easily and reliably work on all but the windiest days.


I am not sure how this is considered a problem. But Lars mentions cooking and cleaning in the dark. I have yet to see anyone camping without some sort of light source. Liquid fuel, propane, or LED lantern, Mag light set to lantern mode, or whatever gear you’ve got that makes light. Use it. One thing I should mention is I have seen many campers try to wash dishes with cold water. Don’t do that. You will not sanitize your dishes. Use a basin, and a big pot on the stove to heat up water, and wash your dishes in hot water like you would at home. Rinse in cold is fine, but wash in hot.


Lars mentioned people burning themselves. I have not experienced that in camp cooking, but just like at home, I use hot pads, long tongs for cooking on the campfire, etc… Basically bring and use proper PPE for what you are doing…


And lastly, Lars talks about people not helping out in the kitchen. Now unless you are hiring an outfitter / guide to do the cooking, and cleaning for you, not helping out in the camp kitchen is a complete jerk move. Make the arrangements before heading out. You want to eat? You help make the food and clean up afterwards. Most of my friends and family are Christian, and to them I quote 2 Thessalonians 3. “If anyone will not work, neither shall he eat.”. I’m open to encouragement I can give to those that are not Christian in this regard!   Cut up the veggies, tend the fire, wash the dishes, something. 


Now something Lars does NOT talk about, but I want to bring up here. As much prep work that you can do PRIOR to the trip, means you have that much less prep work and cleanup to do in camp. I’ve recently done several videos covering at home prep of staple supplies / foods we use in our camp cooking. Due to family history, and us being Texans we tend heavily toward Tex Mex style cooking. It is far easier to prepare, and pack a big batch of Pico De Gallo at home than it is to do that in camp with the veggies right there. And I am NOT going to do an all day slow cook of pintos for refried beans when I can do an instant pot refried beans at home and just reheat in camp!


Lastly, and something Lars didn’t mention, food protection from pests. I am travelling and live in Texas where the only bears are in zoos, so my primary concern is protecting from bugs, squirrels, raccoons, and the occasional coyote. For food storage, I highly recommend the 5 gallon buckets with the Gamma seal lids approach. I have 2 of them, and honestly that is overkill. One of them is perfect for a trip up to around a week in duration. For food waiting to be eaten and presented on the table, use some food nets like what Coleman and Coghlans, and I am sure others sell. Nobody wants roasted corn on the cob campground flies have been all over… Now back to the issue of bears. I am not now claiming to be an expert in protecting yourself, or your foodstuffs from bears. I am aware that there are products on the market intended to be if not bear proof, at least strongly bear resistant. My Lifetime 55 quart high performance cooler is just such a device. Many campgrounds in bear country such as the Mazama Campground on the way to Crater Lake in Oregon are outfitted with Bear boxes that campers are required to store their food in. HOWEVER, if you are in bear territory and no bear box is available, you need a container that is incredibly hard for a bear to get into. For backpackers the bear canister is a usable idea, but for family campers they just aren’t large enough. The gamma seal lids on 5 gallon buckets are certainly a good option as far as the bear not understanding how to unscrew the lid, however a couple of big bear bounces off of the bucket sides may be enough force to pop the lid smooth off of the bucket. In such cases, it might be beneficial, although not super space efficient, to bring along a dedicated extra bear resistant cooler to store things like bread and other refrigeration not required foods. I wouldn’t think you’d have to worry about canned goods, but anything in a plastic bag, box etc…. Like bread, cereals, oatmeal etc… could be at risk, and putting you at risk.


04 April, 2021

DIY Home automation and security. I'm angry. Mostly at myself.

I have built up an automated home with some DIY security that helps keep the honest people honest. Pretty much nothing short of altering a violent dishonest persons state of being will keep them honest, but at least I will have a leg up in that regard. 

My first attempt at the DIY setup was by using an Iris by Lowes system, full protection on all access points, full camera coverage and integration with my personal assistant of choice.

And then as of February 2018 Lowes shut down the Iris cloud services effectively making my Iris by Lowes devices bricks... BUT Lowes had the decency to refund my investment in their system that they were turning off.

Since it worked with at least some of my existing hardware, and was supported and had seucity monitored by 2 of the most recognized and in theory reputable names in Home Security and Automation, I opted to invest in an ADT Smartthings Security hub and sensors, setting my home security on the paid ADT services and again, moving on to a different camera setup due to compatibility issues with my old cams.

Now here we are, April 2021, just a shave over 3 years after diving into ADT Smartthings, I get an email telling me that Samsung and ADT are turning off the cloud services for ADT Smarthings devices. 

Well that's a fine how do you do.

I was never truly impressed with ADT Smartthings to be honest with you. I mean initially it worked well, but within 6 months, I would get frequent errors on sensors where they would report a "loss of supervision" error, I would call Samsung Smartthings support, they would refer me to ADT and we would go in circles neither side wanting to take responsibility for, or support the product. 

This experience has convinced me of something vitally important. And that is local processing / services for my hub and devices is an absolute MUST. Cloud services can, and I am now seeing for the second time, will be cancelled at the whim of the vendor. The vendors can NOT be trusted. 

And while Samsung is offering refunds to customers, they are only giving refunds to customers whose equipment is still under warranty. 

I made my purchase decision based heavily on a long established experience with Samsung products. I have specifically sought out and purchased Samsung optical drives and memory when building PCs in the past, bought Samsung TVs, and every Smart phone I have owned after my HTC Inspire has been a Samsung. And now I feel abandoned, and betrayed by a company that I had an established relationship with. I have 3 smart phones that are up for replacement soon. I will likely not even consider Samsung as a replacement.

Now however, home automation and security wise that is, I am in a bit of a pickle.

I have got to come up with a solution, and have it working before ADT and Samsung kill my functioning system, and I am torn because nothing fully meets my requirements.

#1. Vendor independent. Whatever system I end up with MUST be able to keep doing what I need it to even if a vendor decides to turn their cloud services off. 
#2. Independent of internet. Aside from making external calls that is, there should be absolutely no requirement for the system to remain connected to the internet for it to function, so if a contractor down the road rams a backhoe through the cables / fibers that provid my internet service, I still stay working. It's happened.
#3. Open source. This is where I run into issues. There are open source automation suites out there, but getting them to run on what hardware to provide the needed radios to work with home automation protocols instead of WiFi isn't super straight forward. 

It would seem my options are either straight forward, or not so straight forward. 
#1. It hits all the marks except being open source, and that is Hubitat Elevation hub. They seem to have a good strong community, good support allegedly, and there are a large number of vendors for monitoring services that will make my insurance carrier happy.
#2. Any variety of home automation Linux distributions loaded onto a Rapsberry Pi and outfitted with Zwave and Zigbee dongles as there really is no room in a Pi for the radios for those functions.

So at this point, I am fairly undecided how to proceed. I know Hubitat is basically a drop in kind of thing that just works. Whereas with a Pi based approach, I will need to decide on a distribution, grab a Pi, housing, dongles etc... and cobble it together, and heaven only knows if I can get monitoring.

I have more research to do on this, but I must do it quickly.

This will get to be a lot more pressing should we end up back in office, as for now working remotely really doesn't make it super important. But I am just ticked off that they are doing this and forcing their customers off of their platform...

03 April, 2021

Powering a CPAP for camping, off grid living, or emergencies.

 If you are like me, on CPAP therapy, and have had experiences where you couldn't do therapy either because you were off grid by choice say on a camping trip, or you were without power because your electrical grid operator decided to pull the plug on you due to, whatever reason, you know the terrible burden this leaves on you. For me, one night of no CPAP means a night worse than if I had just not slept, and an almost guaranteed migraine level headache. 

Medical grade CPAP battery packs typically run as much as the CPAP itself or more,  They are little more than a battery pack, a charging circuit, and a 12V output for most CPAPs. And even with efficient travel CPAPs these battery packs rarely last a user for 2 nights sleep, so for extended outages you absolutely MUST have a way to recharge off of 110V AC power. So i your budget is tight, and your CPAP can run off of 12v DC keep reading. I have a solution that will save you a mess of money, and provide you with much longer run time between needing to be recharged. 

I have multiple reasons to run it, but I do have a small, and I mean tiny small generator, a Harbor Freight Tailgator, which is a little 900w peak 2 stroke generator that will easily handle my battery charger for this rig, or a small 5K BTU window AC etc... So I have a way to recharge, but honestly nobody wants to try to sleep while a generator that sounds like a chainsaw is running. I needed a better, more efficient solution to the problem. 

In my last blog post, I described the materials that would be used for a build like what I was doing. Today I present my finished product. 

The project didn't come off perfectly, and I will explain below, but overall I am VERY happy with the results.


So if you see my first photo with the box closed, you will notice that on the group on the left, the 12V outlet is positioned a bit too far left, apparantly I didn't have things measured out was well as I could have liked. Oops.

The charging circuit, I.E. bench top battery charger seen in the second pic leaves a bit to be desired, but it is sized so that I have no issues running it off of my Harbor Freight Tailgator generator, and topping the charge off quickly at 25 amps @ 14v output. (peak I believe). 

I want an onboard charger but they are EXPENSIVE, and typically max out at around 10 amps. I may upgrade my workshop battery charger at home and figure out a way to mount this thing to the box, and add ring terminals to it... Yeah that's probably not going to happen.

Anyway Upon testing, I find the Deyooxi 3 in 1 works, but the voltometers are innaccurate, and they don't even match each other, but rather they both read high and are .1v apart from each other. At best they are a good guess. Good enough, but not perfect.

I found the face plates the 3 in 1 sets came with don't fit accross the raised sections of this battery box. No shock there, So I left them out. This really doesn't need them, and with the oops hole, well...

Now during my hurried testing after the Great Texas Ice Storm and power outage of February 2021, I found that this battery, and a 12V power outlet can and will EASILY power my Z2 Travel CPAP for 4 nights in a row without recharging. Upon setting up to recharge I measured the standing charge in my battery with my multimeter and it measured 12.4V DC, which was still at a very high level. Mind you the Z2 is freakishly efficient. I would have had no issues or concerns running my Airsense 10 with the humidifier turned off during that time on the battery either.

If you want a great off grid power box for items like a CPAP, or USB charging, or even running a 12v compressor fridge, look at my last post as well. I go into the nitty gritty of what I did. It's all bound up nicely, and built in honestly as professional a manner as possible for a hand crafted item. And on the plus side, the skills needed to build this thing are minimal at most.

02 April, 2021

Off Grid power pack for CPAP users. Future expansion.

 I assume for those that have watched my videos, or know me personally know that I am on CPAP therapy. I am also an avid outdoors enthusiast. And have found the 12v portable power packs typically pre designed and sold for use with CPAPs being $350.00 + and having extremely low run times of one night or less effective use before the battery is drained. 

As you no doubt have heard, or even experienced personally, Texas suffered from an extended power outage in Mid February 2021. 

In my experience, I was prepared, or so I thought. I had an Everstart 1100 amp peak jump starter / power pack. I had used it for a max of 2 nights while camping off grid. However during the power outage, and family members thinking this was going to be short enough they were charging phones on it. I didn't even get one hour of CPAP time on it.

I needed a solution. NOW, and I needed one with capacity. Plus I needed to be able to extend my run time off grid for more than 2 days.

While they were open prior to them being forced to close, I was able to run into my local O'Reilly auto parts and grab a group 27 Deep Cycle battery, on what charge they had it with, some crimp on alligator clips, and a 12V power outlet socket. I quickly grafted together a simple rig that had the alligator clips holding on to the positive and negative posts powering the port. This was a quick and dirty way to provide power to my CPAP for the duration of power outage. I did test with my multimeter, starting voltage was at 12.9v, ending voltage after 4 nights of usage of my Z2 CPAP (no humidifier) was at 12.4v. No more than 8 hours night use. The battery was the trick, but was not a permanent solution.

And I need a solution for camping, not just emergency prep, it needs to be portable.

To begin with, I know I needed weather protected ports. I wanted 2 12V ports that were switched. I found panels that provided that, AND a voltometer. HOWEVER, the switches wouldn't quite handle both 12v ports I wanted, so what was the solution? After reviewing, I am going with 2 of the 3 in 1 panels. They provide on / off switch, 12v outlet, 2 USB charge ports, with voltometers. There seem to be a LOT of brand names with the same thing. I opted for the Deyooxi branded one, seems like the same thing in all with the same features.

I am fusing these using inline marine grade ATO fuse holders I already had in my toolbox grafted inline and tied together as a harness. I needed fuses, if I needed new holders I would have ordered the ATO / ATC 12 gauge marine sealed holders and fuse kit from Amazon. ATM fuses are available and smaller, but the fuse holders have insufficient wire for this project. you want 12 or 14 ga, not 16 or 18 ga.

I needed crimp connectors, for butt splices and ring terminals, I wanted heat shrink models. I opted for the 300pc box from Amazon. It works, but quaility is spotty. But all of the options seemed iffy. I will link it here, but use at your own discretion. Metal thickness left me wondering how cheap they could get.

Now I have the stuff to put together, but I need a housing for it all. 

I need a battery box, with enough space for a group 27 battery, AND the connectors in question. The only model I have found is the NOCO Group 27 battery box model HM327BKS.

Lastly, and since I can't find a fair deal on this online I am going to tell you about it. You will need a roll of electrical tape. Walmart has 3/4" x 60' rolls of electrical tape for $0.57 roll. 

So the build and costs are like this.

Battery $99.00 + tax / core charge.

Battery box. $12.99

2 @ Deyooxi 3 in 1 output / switch kits. $16.99 each, $33.98 for both.

Fuse holders / fuses. $12.99

Heat shrink terminals / crimps. $16.22

Electrical Tape. $0.57

That gives me a total for this project of $175.75


Any added length to your wires is going to be out of your inventory and /or buy wire. Again 14 ga wire or better to handle the amperage.


The process I used was.


Disassemble one of the Deyooki sets, use panel for sizing. Attach using masking tape to allow for positioning and holding while marking goes on. Select appropriate sized forstner drill bit, and mark hole centers on 3 device holes. Move to second side, repeat.

Next using sacrificial board line up starter holes and complete drilling device holes using forstner bit.

Assemble devices to panel, panel and devices to box on one side using second 3 in 1 and a guide.Secure using provided backing nuts. Reattach wiring using second 3 in 1 as guide for where wires go. Temporarily attach wires to battery and test function. Disconnect, repeat process for second 3 in 1.

Remove inline glass fuse holder for 3 in 1 power lead, graft in ATO fuse holder loaded with 15 amp fuse using 5/16" ring connector and butt slice, careful to keep length apropriate. Shrink heat shrink tubing on connectors.

Replace ground side ring connectors with 5/16" ring connectors. 

Tape wrap grounds together, and positives together to split off to battery terminals, bringing them together quickly but not too tight. Wrap all wires as a bundled loom until they split out to each side, wrap wires as loom per side. This step protects the wires and keeps them from being just loose and messy in the box.

Make terminal connections for grounds, and positives to the appropriate posts. Not previously mentioned, but assumed you had 5/16" -18 nuts to secure on the threaded posts. Slip positive side ring terminals over positive post, and run nut down / secure, repeat process on negative side. 

Test function on both sides.


Expanding the art.

At some point down the road I am going to want to add a DC / DC charger, and terminal mount AC to DC charger (auto style battery charger with ring terminal attachment). To make this happen I do not want the charging side and the load side to be on the same post. I opted for lead top post to threaded stud marine terminal ends for $1.99 each. 

I am not aware of online sources for this, but I HIGHLY recommend getting the NOCO terminal anti corrosion spray which I got from Walmart Auto Department for something like $3.00, it included a pair of the anti corrosion terminal pads, and a small can or anti corrosion terminal spray. This should be in your auto maintenance took box / supplies to begin with... 


For the time being I am going to use my Black and Decker 25 amp (at 12v) output auto battery charger (max 4 amp at 110v AC) being powered by my Harbor Freight Tailgator 900w peak generator. This is NOT my ideal long term.


LONG TERM GOAL:

I am wanting to eventually build in a 4 battery bank for a long term overlanding rig.. But for the mean time.


I have not opted yet for a specific make or model, but I am looking into a DC to DC charger / charge controller. There are models on the market I am researching that will allow me to charge from both my vehicle alternator, AND solar power. I am not well versed enough in this to speak wisely at this point though...


My pending choice for generator is a 2000 watt peak Aipower SUA2000IV however that is beyond my budget at this time.


With my long term desire for a proper 4 bank battery setup, I am wanting again, long term, to use the NOCO 4 bank onboard charger.

At the point of the 4 bank system, I will want to add a 2KW pure sine wave inverter to produce clean 110v power. I have not selected a specific make or model. The idea is to power laptops, and some misc 110v devices while I try to provide most power via 12V.


As you hopefully can see, I am trying to design my system so that it works for now, and most pieces can be repurposed in the future when a large upgrade in my off grid activity abilities will be made.

11 March, 2021

Campfire cooking. Dutch Oven French Ranch Peppered pot roast.

 Okay time to add another entry to the blog, and a recipe to enjoy. I will be adding this one to video soonest possible as well...


This one uses our camp dutch oven, coals, and time. Use the dutch oven heat guide apps (LOTS available) or bring a printed guide to help you determine how to maintain heat. This works best if you are camping lake / riverfront, and will be fishing it all day close to camp so you can keep an eye on, and tend the fire and coals... NEVER leave a campfire unattended, so don't even think about doing this unless you can commit to being there the whole long slow cook time... This is a recipe that is honestly a crock pot recipe converted time and temp for a camp dutch oven. 


Ingredients.

2.5 - 3lb beef roast.

1 packet dry ranch mix. Hidden valley, store brand really doesn't matter.

1 packet Knorr French Onion Soup Mix

1 stick pasture / grass fed butter.

Pepperoncini peppers drained. About 6 to 8.


Facility issue. You either need a cleaned up / ash removed fire pit, which you could be kind enough to do for the campground, or a dutch oven table. I don't have one of those. If the grate swings out of the way, you can use one of those campground standing grills as a dutch oven table pretty easily. Not all, or even the majority do this though.  And do NOT violate any burn bans. I WILL not be responsible for any legal problems you get into for violating the rules...

Equipment.

You will need a camp dutch oven, the kind with a raised lip on the lid to keep coals from falling off, a hoop to catch the lid lifter on the lid, and of course at least 3 or 4 legs undernath to give you clearance for the coals. You want this pre seasoned, however this recipe will certainly help with seasoning it.

I am upfront about my Amazon affiliate links, but if they are not the best deals I won't post them. And in this case they aren't even close. Presently my local Walmart and I believe chain wide at least in the CONUS, have the Ozark Trail 5 quart cast iron camp dutch oven for under $18.00. https://www.walmart.com/ip/Ozark-Trail-5-Quart-Cast-Iron-Dutch-Oven-with-Handle/55208717 The least expensive one I can find on Amazon starts at over $40.00

Both Walmart and Amazon seem in the same range for thsese so here goes. Dutch Oven Lid Lifter. to help you lift the lid to rotate, and just, well open the thing up https://amzn.to/3qJ39EB

Cast Iron dutch oven trivet. This goes inside the oven and lifts the meat off the bottom to give, well a more oven experience to the contents. You want the kind that goes INSIDE the dutch oven, not the kind the dutch oven sets on. https://www.walmart.com/ip/Lodge-8-inch-Cast-Iron-Meat-Rack-Trivet-Pre-Seasoned-L8DOT3/15836674 

Oven mitts, or something like an Ove Glove. You will want to pick up the dutch oven to rotate it by the bail handle.

Means of igniting charcoal. Do NOT use Match Light. I prefer to use a proper charcoal chimney but you CAN use lighter fluid. 

BBQ tools including long stainless steel tongs to handle the coals.

Material:

Long burning hardwood charcoal. Kingsford or Royal Oak. Walmart's house brand I think it is called Master Grill seems to be rebagged Royal Oak.

Ignition source for the charcoal. In my case old newspapers. 

A BBQ lighter.


Procedure:

Pre heat number of coals given by your dutch oven temp guide in your chacoal chimney, +  4 or so coals until the top coals are grayed over. 

Place the trivet in and the lid on the dutch oven.

Place the proper number according to your calcuator for the lid of the dutch oven.

Let this heat up for 10-15 minutes, allowing the cast iron to get fully hot, and the inside air of the DO to get fully hot.

Remove the lid of the DO and set aside on a clean heat safe surface.

Place the roast on the trivet.

Sprinkle the ranch powder on the roast.

Sprinkle the French Onion Soup mix on the roast.

Unwrap and place the stick of butter on the roast.

Place the peppers on the roast next to the butter.

Carefully place the lid back on the dutch oven.

Cook for 2.5 to 3 hours maintaining the 325 deg F. Every 15 to 30 minutes pick up Dutch oven and rotate 90 degrees clockwise, Rotate lid another 90 degrees clockwise. Replace coals every 30 minutes or so. Place partially spent coals in campfire. 

At 2.5 to 3hr mark, remove from heat. Let rest for 10 min before serving.

Serve with your choice, but we like foil packet roasted veggies, grilled asparagus or similar greens, a couple of small roasted potatoes, and some crusty french bread.